<?xml version="1.0" encoding="utf-8"?>
<feed xmlns="http://www.w3.org/2005/Atom">
  <author>
    <name>Penguin</name>
  </author>
  <generator uri="https://hexo.io/">Hexo</generator>
  <id>https://penguinway.github.io/</id>
  <link href="https://penguinway.github.io/" rel="alternate"/>
  <link href="https://penguinway.github.io/atom.xml" rel="self"/>
  <rights>All rights reserved 2026, Penguin</rights>
  <subtitle>Happy Life~</subtitle>
  <title>企鹅的小站</title>
  <updated>2025-04-07T05:25:33.000Z</updated>
  <entry>
    <author>
      <name>Penguin</name>
    </author>
    <category term="开发" scheme="https://penguinway.github.io/tags/%E5%BC%80%E5%8F%91/"/>
    <content>
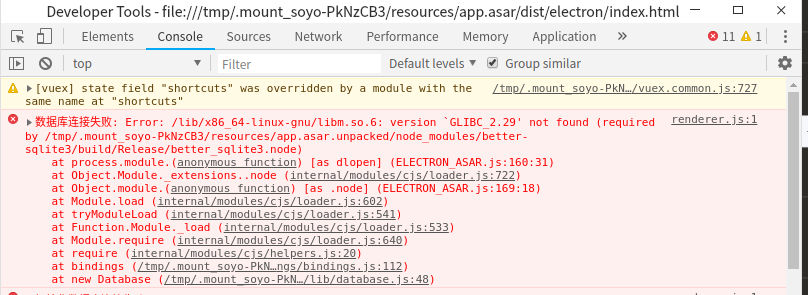
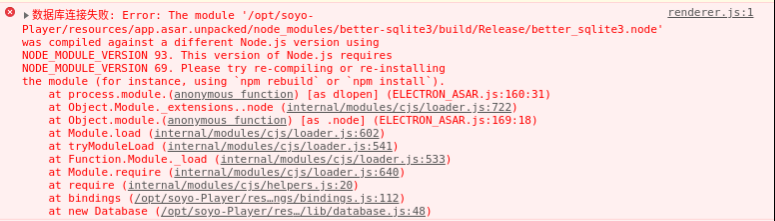
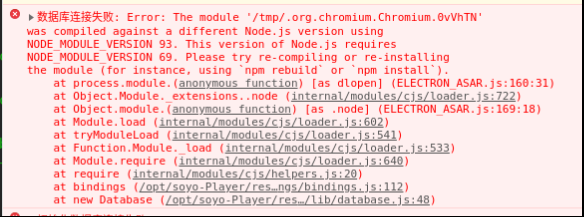
      <![CDATA[<h1 id="Electron-音视频播放器开发踩坑2"><a href="#Electron-音视频播放器开发踩坑2" class="headerlink" title="Electron 音视频播放器开发踩坑2"></a>Electron 音视频播放器开发踩坑2</h1><p>**承接上文 **<a href="https://penguinway.github.io/2025/03/26/Electron%E9%9F%B3%E8%A7%86%E9%A2%91%E6%92%AD%E6%94%BE%E5%99%A8%E5%BC%80%E5%8F%91%E8%B8%A9%E5%9D%91/">Electron 音视频播放器开发踩坑</a></p><h2 id="一、踩坑一：在统信UOS上遇到需要GLIBC-2-29问题"><a href="#一、踩坑一：在统信UOS上遇到需要GLIBC-2-29问题" class="headerlink" title="一、踩坑一：在统信UOS上遇到需要GLIBC_2.29问题"></a>一、踩坑一：在统信UOS上遇到需要GLIBC_2.29问题</h2><p><strong>在统信UOS20E系统运行时，出现该问题</strong></p><p><img src="https://image.penguinway.space/i/2025/04/07/67f359f2c165a.png"></p><p><strong>该问题主要是因为UOS系统GLIBC库最高只支持到2.28，但是better-sqlite3需要2.29以上，我们又不能轻易更新GLIBC库，因为牵涉到系统环境，一更新就系统崩溃（别问我为什么知道</strong></p><h3 id="解决方案"><a href="#解决方案" class="headerlink" title="解决方案"></a>解决方案</h3><p><strong>这时候我们可以使用</strong><a href="https://gitee.com/CongTianKong">@从天空</a>大佬开发的<a href="https://gitee.com/spark-store-project/additional-base-lib">Additional Base Lib 附加基础库</a>项目，在UOS上使用高于系统GLIBC库的应用程序了</p><p><strong>该项目旨在用轻量级容器工具bubblewrap解决GNU&#x2F;Linux操作系统中常见的glibc不兼容问题，正好解决了我们的问题~</strong></p><h2 id="二、踩坑二：better-sqlite3在Linux无法使用"><a href="#二、踩坑二：better-sqlite3在Linux无法使用" class="headerlink" title="二、踩坑二：better-sqlite3在Linux无法使用"></a>二、踩坑二：better-sqlite3在Linux无法使用</h2><p><strong>在上篇文章中，我们使用electron-rebuild工具，将better-sqlite3重新编译为electron相匹配的Node_Module_Version，但是在Linux下仍然无法使用，具体表现为：</strong></p><p><img src="https://image.penguinway.space/i/2025/04/07/67f35e76e6dd2.png"></p><p><img src="https://image.penguinway.space/i/2025/04/07/67f35e88716a4.png"></p><p><strong>该问题我猜想是我编译的时候附带的nodedir指定的NODE_MODULE_VERSION是93（即node 16.20.2)，但是不指定会出现其他问题，所以在一番资料查找之后，还是决定对better-sqlite3进行手动编译</strong></p><h3 id="解决方案-1"><a href="#解决方案-1" class="headerlink" title="解决方案"></a>解决方案</h3><p><strong>运行命令如下</strong></p><figure class="highlight plaintext"><table><tr><td class="gutter"><pre><span class="line">1</span><br><span class="line">2</span><br></pre></td><td class="code"><pre><span class="line">cd node_modules/better-sqlite3/</span><br><span class="line">node-gyp rebuild --target=&lt;your electron version&gt; --arch=x64 --dist-url=https://electronjs.org/headers</span><br></pre></td></tr></table></figure><p><strong>这样就成功对better-sqlite3进行了重编译，再次运行发现问题已解决</strong></p>]]>
    </content>
    <id>https://penguinway.github.io/posts/15605.html</id>
    <link href="https://penguinway.github.io/posts/15605.html"/>
    <published>2025-04-07T05:25:33.000Z</published>
    <summary>
      <![CDATA[<h1 id="Electron-音视频播放器开发踩坑2"><a href="#Electron-音视频播放器开发踩坑2" class="headerlink" title="Electron 音视频播放器开发踩坑2"></a>Electron 音视频播放器开发踩坑2</h1><]]>
    </summary>
    <title>Electron音视频播放器开发踩坑2</title>
    <updated>2025-04-07T05:25:33.000Z</updated>
  </entry>
  <entry>
    <author>
      <name>Penguin</name>
    </author>
    <category term="开发" scheme="https://penguinway.github.io/categories/%E5%BC%80%E5%8F%91/"/>
    <category term="开发" scheme="https://penguinway.github.io/tags/%E5%BC%80%E5%8F%91/"/>
    <content>
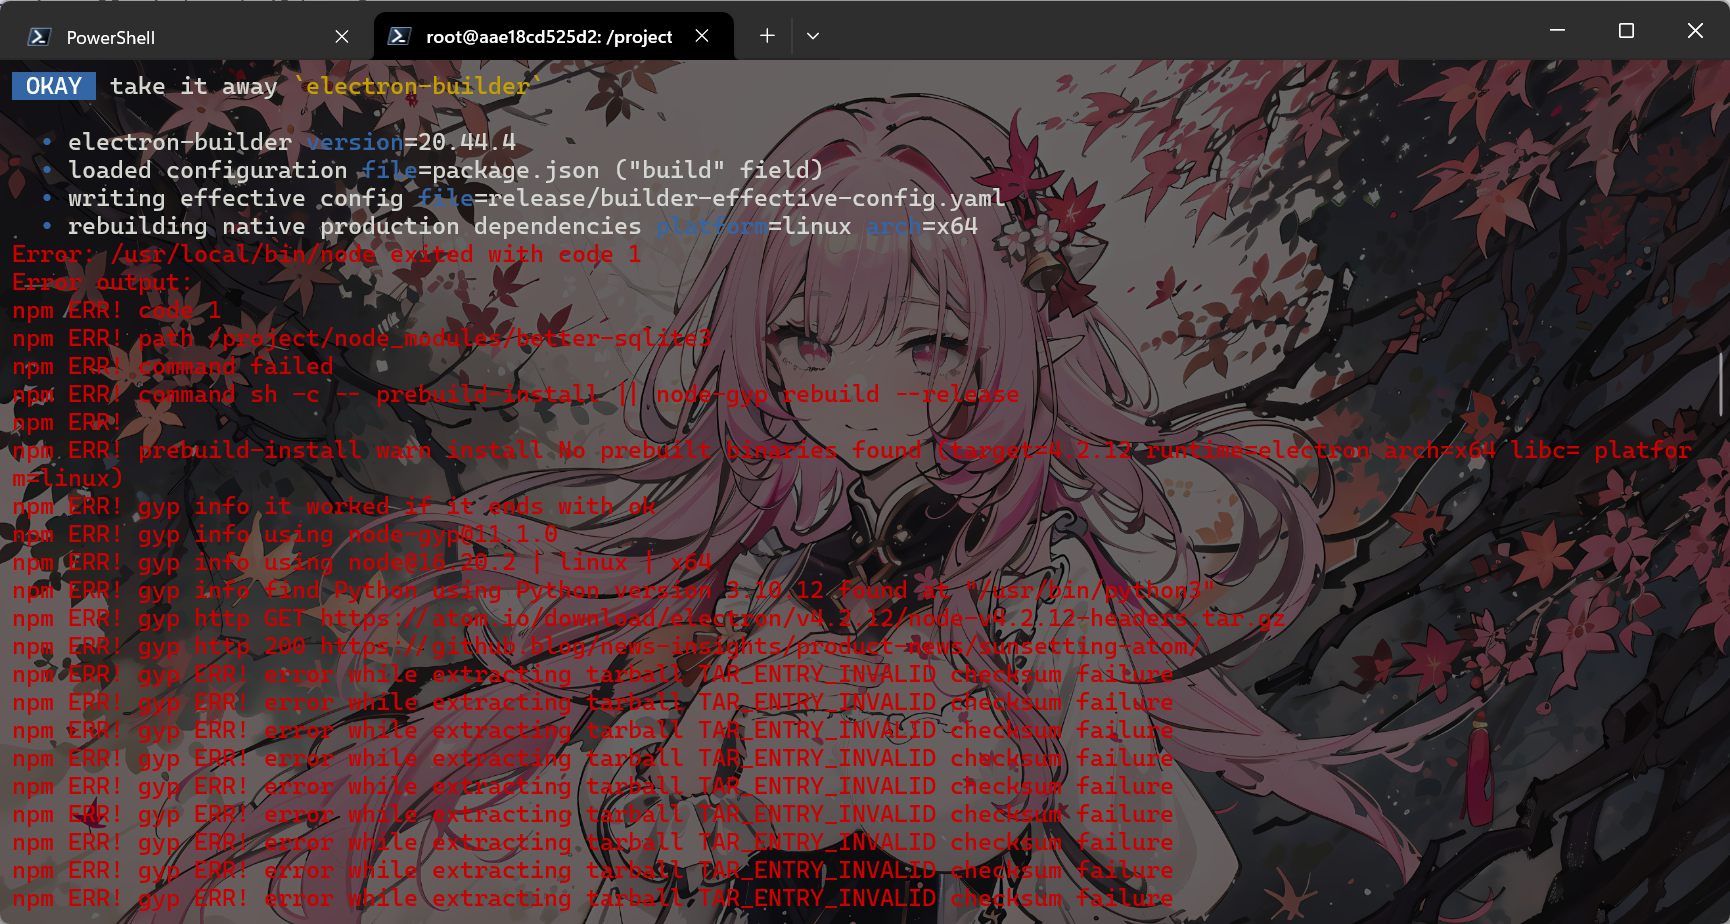
      <![CDATA[<h1 id="Electron-音视频播放器开发踩坑"><a href="#Electron-音视频播放器开发踩坑" class="headerlink" title="Electron 音视频播放器开发踩坑"></a>Electron 音视频播放器开发踩坑</h1><h2 id="一-环境"><a href="#一-环境" class="headerlink" title="一. 环境"></a>一. 环境</h2><p>笔者环境配置如下</p><figure class="highlight bash"><table><tr><td class="gutter"><pre><span class="line">1</span><br><span class="line">2</span><br><span class="line">3</span><br><span class="line">4</span><br><span class="line">5</span><br><span class="line">6</span><br></pre></td><td class="code"><pre><span class="line">Node.js==16.20.2</span><br><span class="line">electron==4.2.12</span><br><span class="line">electron-build==20.44.4</span><br><span class="line">node-gyp==11.1.0</span><br><span class="line">better-sqlite3==11.9.1</span><br><span class="line">...</span><br></pre></td></tr></table></figure><h2 id="二-踩坑一：better-sqlite3无法直接使用"><a href="#二-踩坑一：better-sqlite3无法直接使用" class="headerlink" title="二. 踩坑一：better-sqlite3无法直接使用"></a>二. 踩坑一：better-sqlite3无法直接使用</h2><p>因为开发时使用的node版本与使用的Electron内内置的node版本不一致，导致在运行时，控制台提示：</p><figure class="highlight bash"><table><tr><td class="gutter"><pre><span class="line">1</span><br><span class="line">2</span><br><span class="line">3</span><br><span class="line">4</span><br><span class="line">5</span><br></pre></td><td class="code"><pre><span class="line">Uncaught Error: The module <span class="string">&#x27;\\?\D:\code\player\node_modules\better-sqlite3\build\Release\better_sqlite3.node&#x27;</span></span><br><span class="line">was compiled against a different Node.js version using</span><br><span class="line">NODE_MODULE_VERSION 115. This version of Node.js requires</span><br><span class="line">NODE_MODULE_VERSION 69. Please try re-compiling or re-installing</span><br><span class="line">the module (<span class="keyword">for</span> instance, using `npm rebuild` or `npm install`).</span><br></pre></td></tr></table></figure><h3 id="解决方案"><a href="#解决方案" class="headerlink" title="解决方案"></a>解决方案</h3><p>使用electron-rebuild工具将better-sqlite3 rebuild为与electron内内置node版本相匹配的版本</p><h3 id="具体步骤"><a href="#具体步骤" class="headerlink" title="具体步骤"></a>具体步骤</h3><ol><li>卸载掉存在的electron-rebuild和better-sqlite3</li><li>首先安装electron-rebuild，其后安装better-sqlite3，请注意该顺序非常重要</li><li>在package.json添加script[<strong>“rebuild”</strong>: “electron-rebuild -f -w better-sqlite3”]或直接运行electron-rebuild -f -w better-sqlite3</li><li>运行结束后即解决该问题</li></ol><h3 id="可能的报错"><a href="#可能的报错" class="headerlink" title="可能的报错"></a>可能的报错</h3><h4 id="1-‘openssl-fips’-is-not-defined-while-evaluating-condition-‘openssl-fips-“”‘"><a href="#1-‘openssl-fips’-is-not-defined-while-evaluating-condition-‘openssl-fips-“”‘" class="headerlink" title="1. ‘openssl_fips’ is not defined while evaluating condition ‘openssl_fips !&#x3D; “”‘"></a>1. ‘openssl_fips’ is not defined while evaluating condition ‘openssl_fips !&#x3D; “”‘</h4><p>前往~&#x2F;.electron-gyp&#x2F;12.2.3&#x2F;include&#x2F;node&#x2F;common.gypi，将</p><figure class="highlight json"><table><tr><td class="gutter"><pre><span class="line">1</span><br></pre></td><td class="code"><pre><span class="line"><span class="punctuation">&#123;</span>&#x27;variables&#x27;<span class="punctuation">:</span><span class="punctuation">&#123;</span>&#x27;built_with_electron&#x27;<span class="punctuation">:</span> <span class="number">1</span><span class="punctuation">&#125;</span><span class="punctuation">&#125;</span></span><br></pre></td></tr></table></figure><p>覆盖为</p><figure class="highlight json"><table><tr><td class="gutter"><pre><span class="line">1</span><br></pre></td><td class="code"><pre><span class="line"><span class="punctuation">&#123;</span>&#x27;variables&#x27;<span class="punctuation">:</span><span class="punctuation">&#123;</span>&#x27;built_with_electron&#x27;<span class="punctuation">:</span> <span class="number">1</span><span class="punctuation">,</span> &#x27;openssl_fips&#x27;<span class="punctuation">:</span> &#x27;&#x27;<span class="punctuation">&#125;</span><span class="punctuation">&#125;</span></span><br></pre></td></tr></table></figure><h4 id="2-Error-Could-not-find-any-Visual-Studio-installation-to-use"><a href="#2-Error-Could-not-find-any-Visual-Studio-installation-to-use" class="headerlink" title="2. Error: Could not find any Visual Studio installation to use"></a>2. Error: Could not find any Visual Studio installation to use</h4><p>谷歌上解决方法很多，但是笔者使用过后没有作用，最后根据一篇github issue将node版本降级到16后，在管理员权限下安装windows-build-tools后解决</p><figure class="highlight bash"><table><tr><td class="gutter"><pre><span class="line">1</span><br></pre></td><td class="code"><pre><span class="line">npm install windows-build-tools -g</span><br></pre></td></tr></table></figure><p>该模块笔者是node版本降级到16才能安装，其他更高版本均报错</p><figure class="highlight bash"><table><tr><td class="gutter"><pre><span class="line">1</span><br></pre></td><td class="code"><pre><span class="line">Error: TypeError: <span class="string">&#x27;process.env&#x27;</span> only accepts a configurable whileinstall windows-build-tools</span><br></pre></td></tr></table></figure><p><img src="https://image.penguinway.space/i/2025/03/26/67e3f5c1d6956.png"></p><h2 id="三-踩坑二：Windows下无法直接打包Linux软件"><a href="#三-踩坑二：Windows下无法直接打包Linux软件" class="headerlink" title="三. 踩坑二：Windows下无法直接打包Linux软件"></a>三. 踩坑二：Windows下无法直接打包Linux软件</h2><h3 id="解决方案-1"><a href="#解决方案-1" class="headerlink" title="解决方案"></a>解决方案</h3><p>使用electronuserland&#x2F;builder docker容器进行打包</p><figure class="highlight bash"><table><tr><td class="gutter"><pre><span class="line">1</span><br><span class="line">2</span><br></pre></td><td class="code"><pre><span class="line">docker pull electronuserland/builder</span><br><span class="line">docker run --<span class="built_in">rm</span> -ti -v &#123;path to your code&#125;:/project -w /project electronuserland/builder:16-wine-chrome-03.25</span><br></pre></td></tr></table></figure><p>随后在开启的容器bash内执行npm run build即可</p><h3 id="可能的报错-1"><a href="#可能的报错-1" class="headerlink" title="可能的报错"></a>可能的报错</h3><h4 id="1-npm-run-build时gyp-http-GET-https-atom-io-download-electron-v4-2-12-node-v4-2-12-headers-tar-gz"><a href="#1-npm-run-build时gyp-http-GET-https-atom-io-download-electron-v4-2-12-node-v4-2-12-headers-tar-gz" class="headerlink" title="1.npm run build时gyp http GET https://atom.io/download/electron/v4.2.12/node-v4.2.12-headers.tar.gz"></a>1.npm run build时gyp http GET <a href="https://atom.io/download/electron/v4.2.12/node-v4.2.12-headers.tar.gz">https://atom.io/download/electron/v4.2.12/node-v4.2.12-headers.tar.gz</a></h4><p>报错：</p><p><img src="https://image.penguinway.space/i/2025/03/26/67e3f54d9cdab.png"></p><p>该下载请求因为atom存储库已经停用，会被转到GitHub说明情况的一篇博文上</p><p>解决方法是</p><figure class="highlight bash"><table><tr><td class="gutter"><pre><span class="line">1</span><br><span class="line">2</span><br><span class="line">3</span><br></pre></td><td class="code"><pre><span class="line">npm install node-gyp -g</span><br><span class="line">node-gyp install &lt;your node version&gt; --dist-url=https://nodejs.org/download/release/</span><br><span class="line">npm run build --nodedir=~/.cache/node-gyp/&lt;your node version&gt;</span><br></pre></td></tr></table></figure><p>随后即可解决该问题</p>]]>
    </content>
    <id>https://penguinway.github.io/posts/62818.html</id>
    <link href="https://penguinway.github.io/posts/62818.html"/>
    <published>2025-03-26T13:16:16.000Z</published>
    <summary>
      <![CDATA[<h1 id="Electron-音视频播放器开发踩坑"><a href="#Electron-音视频播放器开发踩坑" class="headerlink" title="Electron 音视频播放器开发踩坑"></a>Electron 音视频播放器开发踩坑</h1><h2 i]]>
    </summary>
    <title>Electron音视频播放器开发踩坑</title>
    <updated>2025-03-26T13:16:16.000Z</updated>
  </entry>
  <entry>
    <author>
      <name>Penguin</name>
    </author>
    <content>
      <![CDATA[<p>Welcome to <a href="https://hexo.io/">Hexo</a>! This is your very first post. Check <a href="https://hexo.io/docs/">documentation</a> for more info. If you get any problems when using Hexo, you can find the answer in <a href="https://hexo.io/docs/troubleshooting.html">troubleshooting</a> or you can ask me on <a href="https://github.com/hexojs/hexo/issues">GitHub</a>.</p><h2 id="Quick-Start"><a href="#Quick-Start" class="headerlink" title="Quick Start"></a>Quick Start</h2><h3 id="Create-a-new-post"><a href="#Create-a-new-post" class="headerlink" title="Create a new post"></a>Create a new post</h3><figure class="highlight bash"><table><tr><td class="gutter"><pre><span class="line">1</span><br></pre></td><td class="code"><pre><span class="line">$ hexo new <span class="string">&quot;My New Post&quot;</span></span><br></pre></td></tr></table></figure><p>More info: <a href="https://hexo.io/docs/writing.html">Writing</a></p><h3 id="Run-server"><a href="#Run-server" class="headerlink" title="Run server"></a>Run server</h3><figure class="highlight bash"><table><tr><td class="gutter"><pre><span class="line">1</span><br></pre></td><td class="code"><pre><span class="line">$ hexo server</span><br></pre></td></tr></table></figure><p>More info: <a href="https://hexo.io/docs/server.html">Server</a></p><h3 id="Generate-static-files"><a href="#Generate-static-files" class="headerlink" title="Generate static files"></a>Generate static files</h3><figure class="highlight bash"><table><tr><td class="gutter"><pre><span class="line">1</span><br></pre></td><td class="code"><pre><span class="line">$ hexo generate</span><br></pre></td></tr></table></figure><p>More info: <a href="https://hexo.io/docs/generating.html">Generating</a></p><h3 id="Deploy-to-remote-sites"><a href="#Deploy-to-remote-sites" class="headerlink" title="Deploy to remote sites"></a>Deploy to remote sites</h3><figure class="highlight bash"><table><tr><td class="gutter"><pre><span class="line">1</span><br></pre></td><td class="code"><pre><span class="line">$ hexo deploy</span><br></pre></td></tr></table></figure><p>More info: <a href="https://hexo.io/docs/one-command-deployment.html">Deployment</a></p>]]>
    </content>
    <id>https://penguinway.github.io/posts/16107.html</id>
    <link href="https://penguinway.github.io/posts/16107.html"/>
    <published>2024-05-01T07:43:31.720Z</published>
    <summary>
      <![CDATA[<p>Welcome to <a href="https://hexo.io/">Hexo</a>! This is your very first post. Check <a href="https://hexo.io/docs/">documentation</a> for]]>
    </summary>
    <title>Hello World</title>
    <updated>2024-05-01T07:43:31.720Z</updated>
  </entry>
  <entry>
    <author>
      <name>Penguin</name>
    </author>
    <category term="2023" scheme="https://penguinway.github.io/categories/2023/"/>
    <category term="CTF" scheme="https://penguinway.github.io/categories/CTF/"/>
    <category term="Misc" scheme="https://penguinway.github.io/categories/CTF/Misc/"/>
    <category term="CTF" scheme="https://penguinway.github.io/tags/CTF/"/>
    <content>
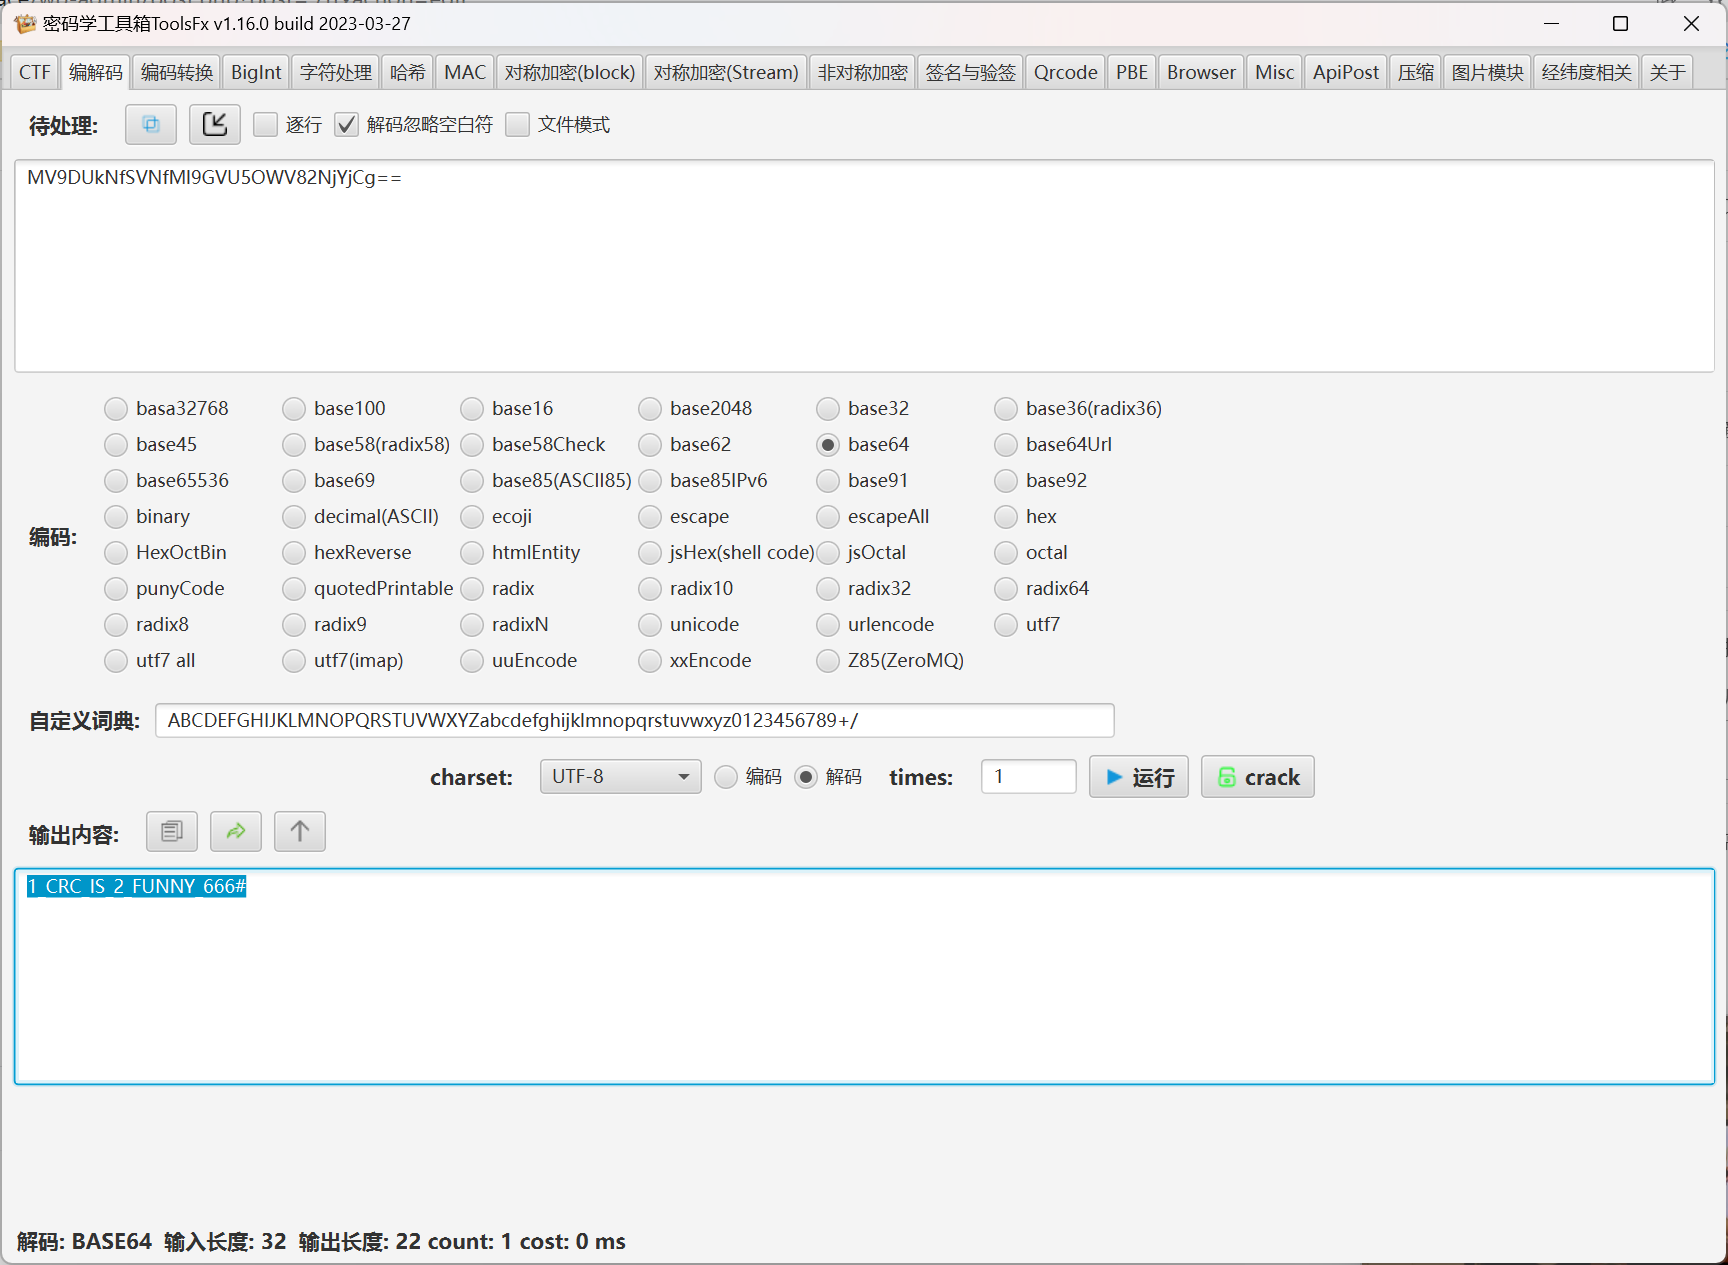
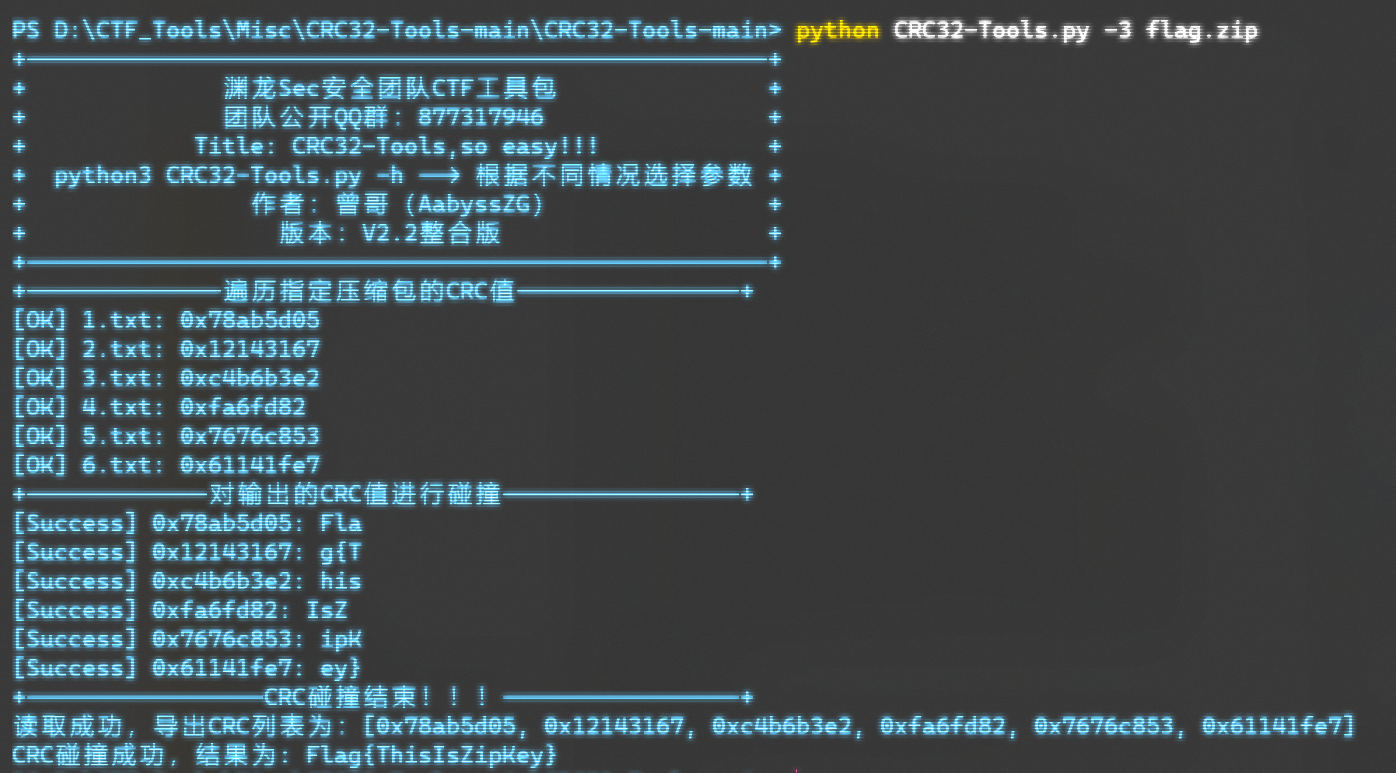
      <![CDATA[<p><a href="https://www.penguinway.space/wp-content/uploads/2023/09/%E5%93%87%E6%B5%B7%E8%B4%BC%E7%8E%8B.zip">附件：哇海贼王</a><a href="https://www.penguinway.space/wp-content/uploads/2023/09/%E5%93%87%E6%B5%B7%E8%B4%BC%E7%8E%8B.zip">下载</a></p><h3 id="思路："><a href="#思路：" class="headerlink" title="思路："></a>思路：</h3><p>刚拿到题目的时候毫无思路awa，事实上到最后也没做出来QAQ，在jht3学长的指导下发现居然挺简单的，追悔莫及QAQ，总的来说是结合了文件Hex+CRC爆破和一点点拼图技术的题目</p><h3 id="过程："><a href="#过程：" class="headerlink" title="过程："></a>过程：</h3><p>首先观察图片，在Windows属性中可以看到Hint：“key in jpg”</p><p>使用WinHex打开图片，发现在文件末尾有base64串：”MV9DUkNfSVNfMl9GVU5OWV82NjYjCg&#x3D;&#x3D;“</p><p>解码得”1_CRC_IS_2_FUNNY_666#“</p><p><img src="http://image.penguinway.space/i/2023/09/16/6505c8e2758ad.png"></p><p>得知其为flag1.zip压缩文件的密码，解压得flag.zip文件</p><p>使用7zip打开flag.zip文件知其有密码，暴力破解无果，又观察知内部的几个txt文件仅3byte，故决定使用crc爆破得知其内容，使用Github开源项目进行爆破</p><p> <a href="https://github.com/" title="Github">GitHub</a></p><p><a href="https://github.com/AabyssZG/CRC32-Tools">AabyssZG&#x2F;CRC32-Tools</a></p><p><img src="http://image.penguinway.space/i/2023/09/16/6505ca2e29598.png"></p><p>得到flag2.zip压缩文件的密码，得到若干碎片图片，接下来就是快乐的拼图了~</p><p>拼图过程略！~</p>]]>
    </content>
    <id>https://penguinway.github.io/posts/1997.html</id>
    <link href="https://penguinway.github.io/posts/1997.html"/>
    <published>2023-09-16T15:33:58.000Z</published>
    <summary>
      <![CDATA[<p><a href="https://www.penguinway.space/wp-content/uploads/2023/09/%E5%93%87%E6%B5%B7%E8%B4%BC%E7%8E%8B.zip">附件：哇海贼王</a><a href="https://ww]]>
    </summary>
    <title>[Misc]哇！海贼王！(黑龙江省赛)</title>
    <updated>2023-09-16T15:33:58.000Z</updated>
  </entry>
  <entry>
    <author>
      <name>Penguin</name>
    </author>
    <category term="2023" scheme="https://penguinway.github.io/categories/2023/"/>
    <category term="CTF" scheme="https://penguinway.github.io/categories/CTF/"/>
    <category term="Misc" scheme="https://penguinway.github.io/categories/CTF/Misc/"/>
    <category term="CTF" scheme="https://penguinway.github.io/tags/CTF/"/>
    <content>
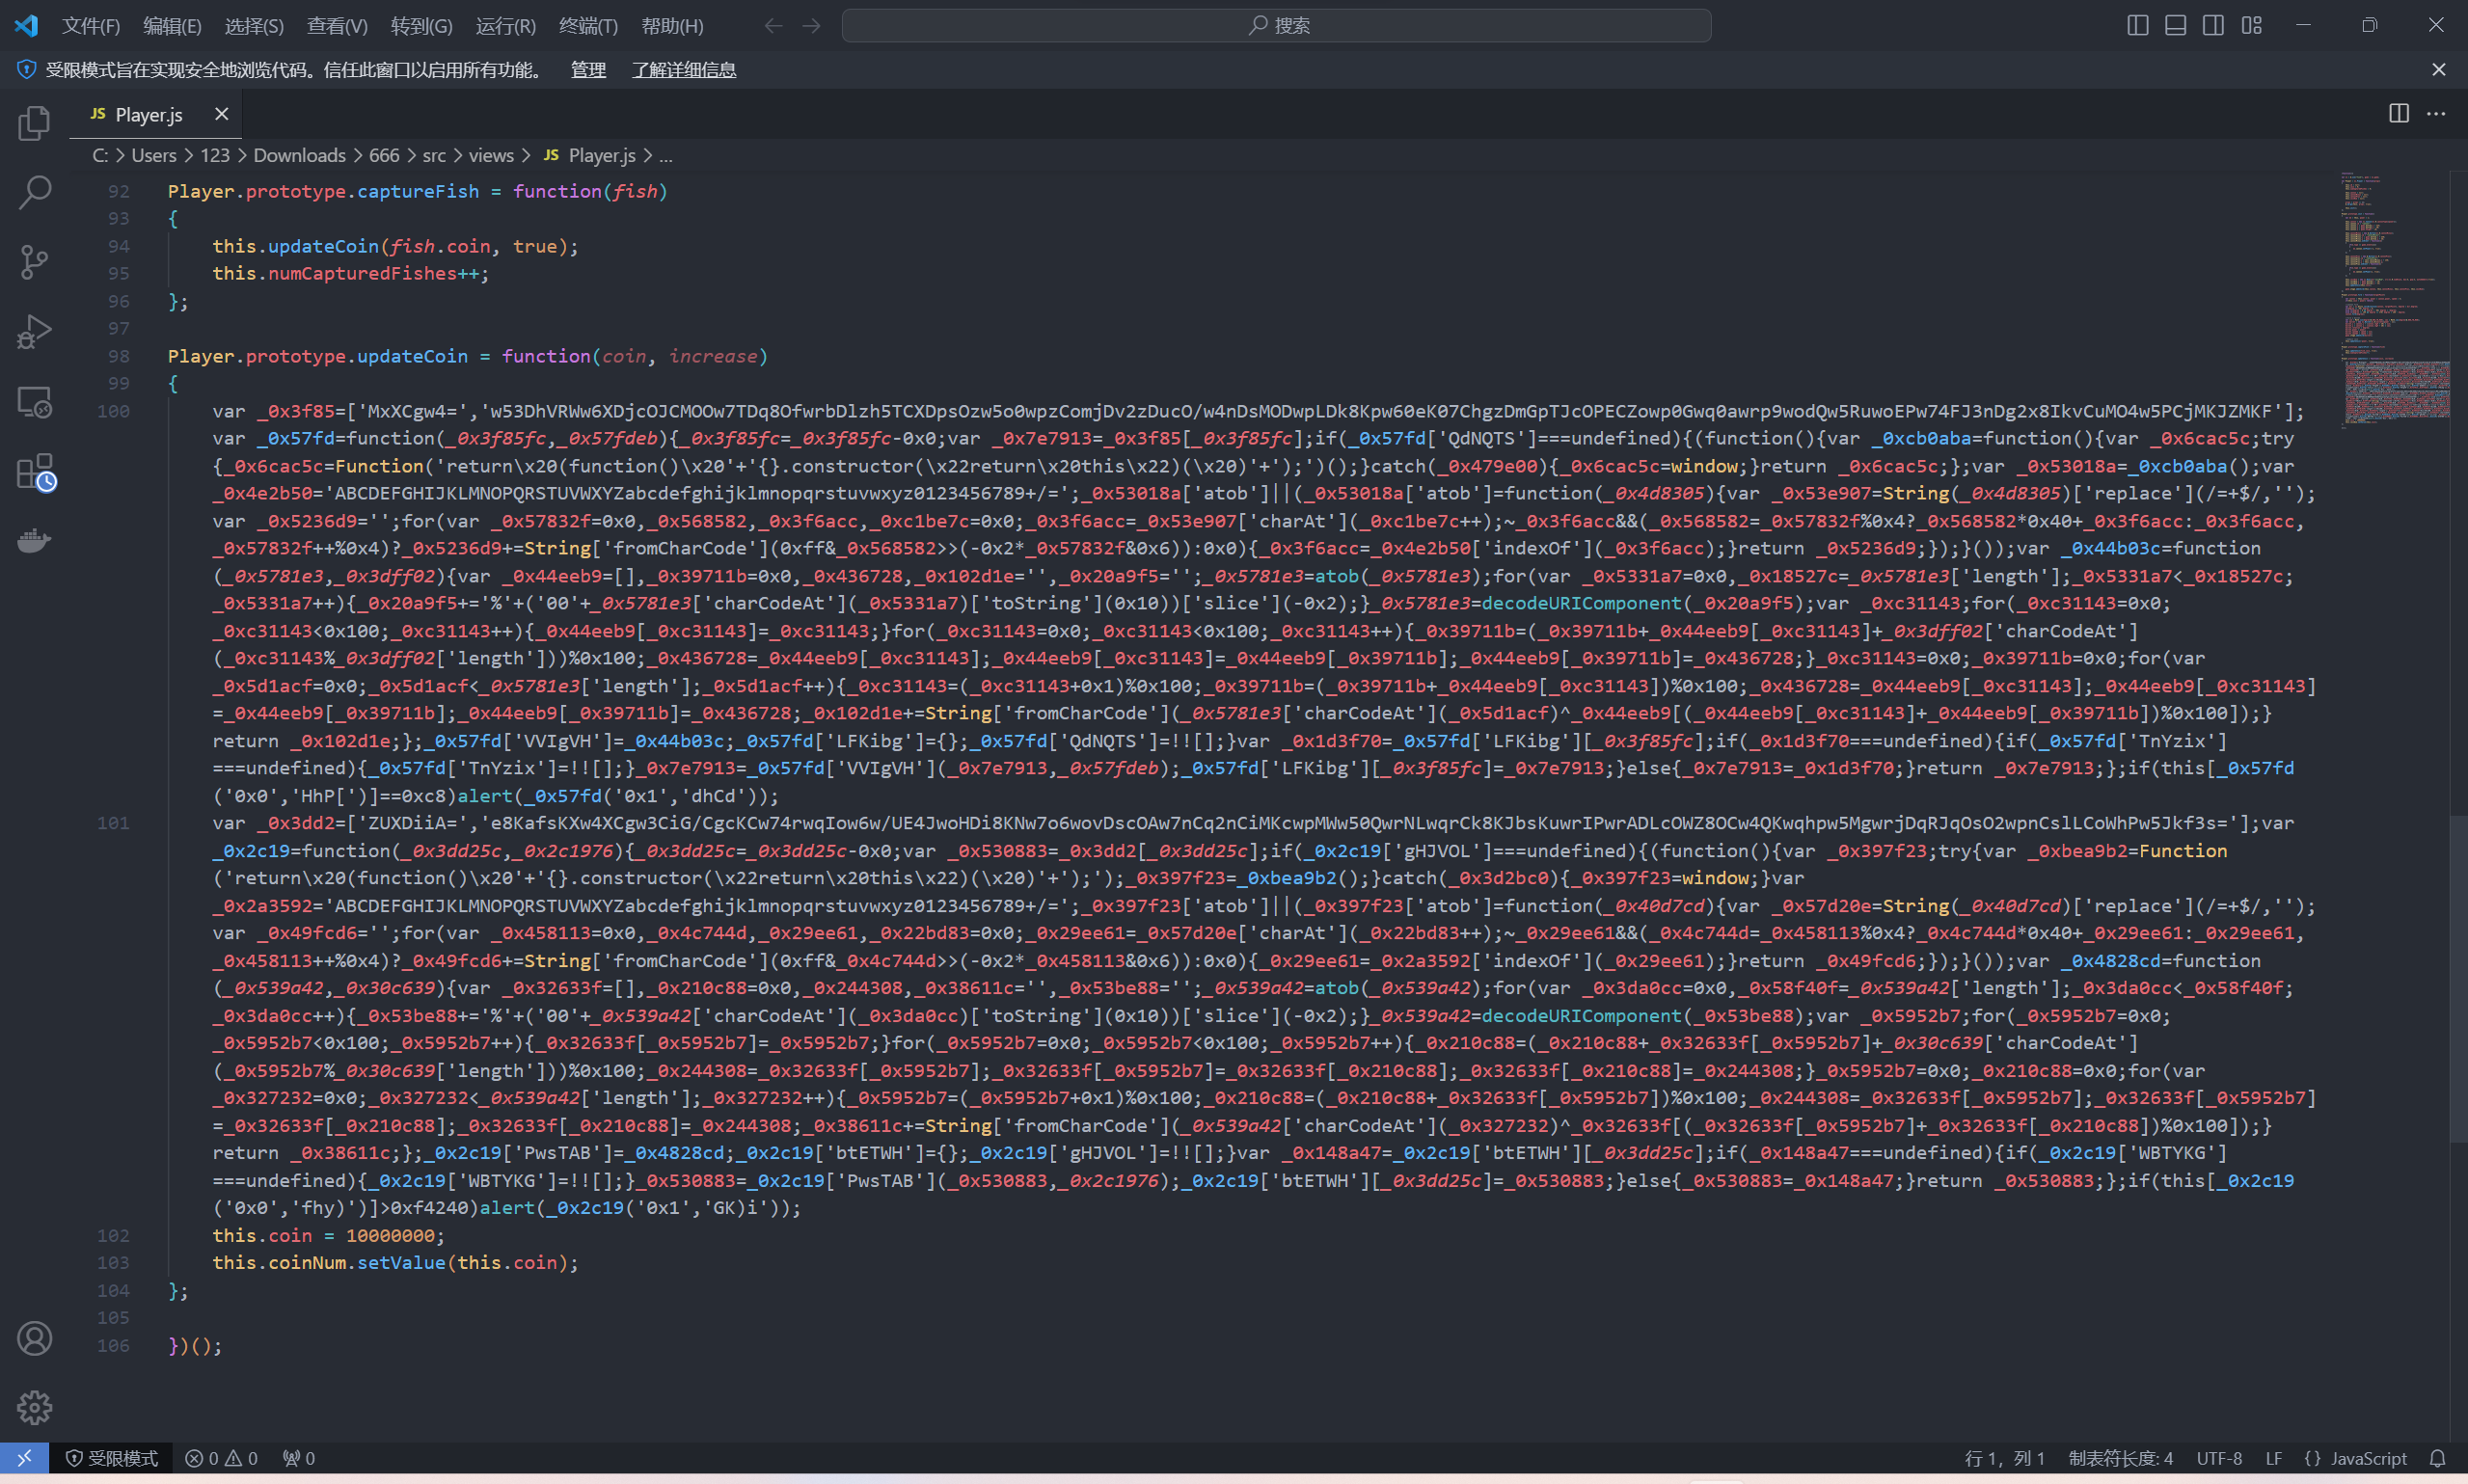
      <![CDATA[<p><a href="https://www.penguinway.space/wp-content/uploads/2023/09/%E7%99%BE%E4%B8%87%E5%AF%8C%E7%BF%81.zip">附件：百万富翁</a><a href="https://www.penguinway.space/wp-content/uploads/2023/09/%E7%99%BE%E4%B8%87%E5%AF%8C%E7%BF%81.zip">下载</a></p><h4 id="思路："><a href="#思路：" class="headerlink" title="思路："></a>思路：</h4><p>在附件中找到index.html，观察其结构，再结合题目知，需将分数打到1000000，方能解锁flag，故而可知需找到对应的JavaScript文件解决题目。</p><h4 id="过程："><a href="#过程：" class="headerlink" title="过程："></a>过程：</h4><p>按图索骥，找到Play.js</p><p><img src="http://image.penguinway.space/i/2023/09/16/6505be9a2dcff.png"></p><p>看到一大pia代码块，显然其为典型的JS混淆，那就通过工具网站<a href="https://www.dejs.vip/">Dejs</a>进行反混淆~</p><p>最终得到flag，注意flag分两段</p><p><img src="http://image.penguinway.space/i/2023/09/16/6505c06e77959.png"></p><p><img src="http://image.penguinway.space/i/2023/09/16/6505c027a117f.png"></p>]]>
    </content>
    <id>https://penguinway.github.io/posts/63069.html</id>
    <link href="https://penguinway.github.io/posts/63069.html"/>
    <published>2023-09-16T14:50:10.000Z</published>
    <summary>
      <![CDATA[<p><a href="https://www.penguinway.space/wp-content/uploads/2023/09/%E7%99%BE%E4%B8%87%E5%AF%8C%E7%BF%81.zip">附件：百万富翁</a><a href="https://ww]]>
    </summary>
    <title>[Misc]百万富翁WP</title>
    <updated>2023-09-16T14:50:10.000Z</updated>
  </entry>
  <entry>
    <author>
      <name>Penguin</name>
    </author>
    <category term="2023" scheme="https://penguinway.github.io/categories/2023/"/>
    <category term="CTF" scheme="https://penguinway.github.io/categories/CTF/"/>
    <category term="CTF" scheme="https://penguinway.github.io/tags/CTF/"/>
    <category term="CISCN2023" scheme="https://penguinway.github.io/tags/CISCN2023/"/>
    <content>
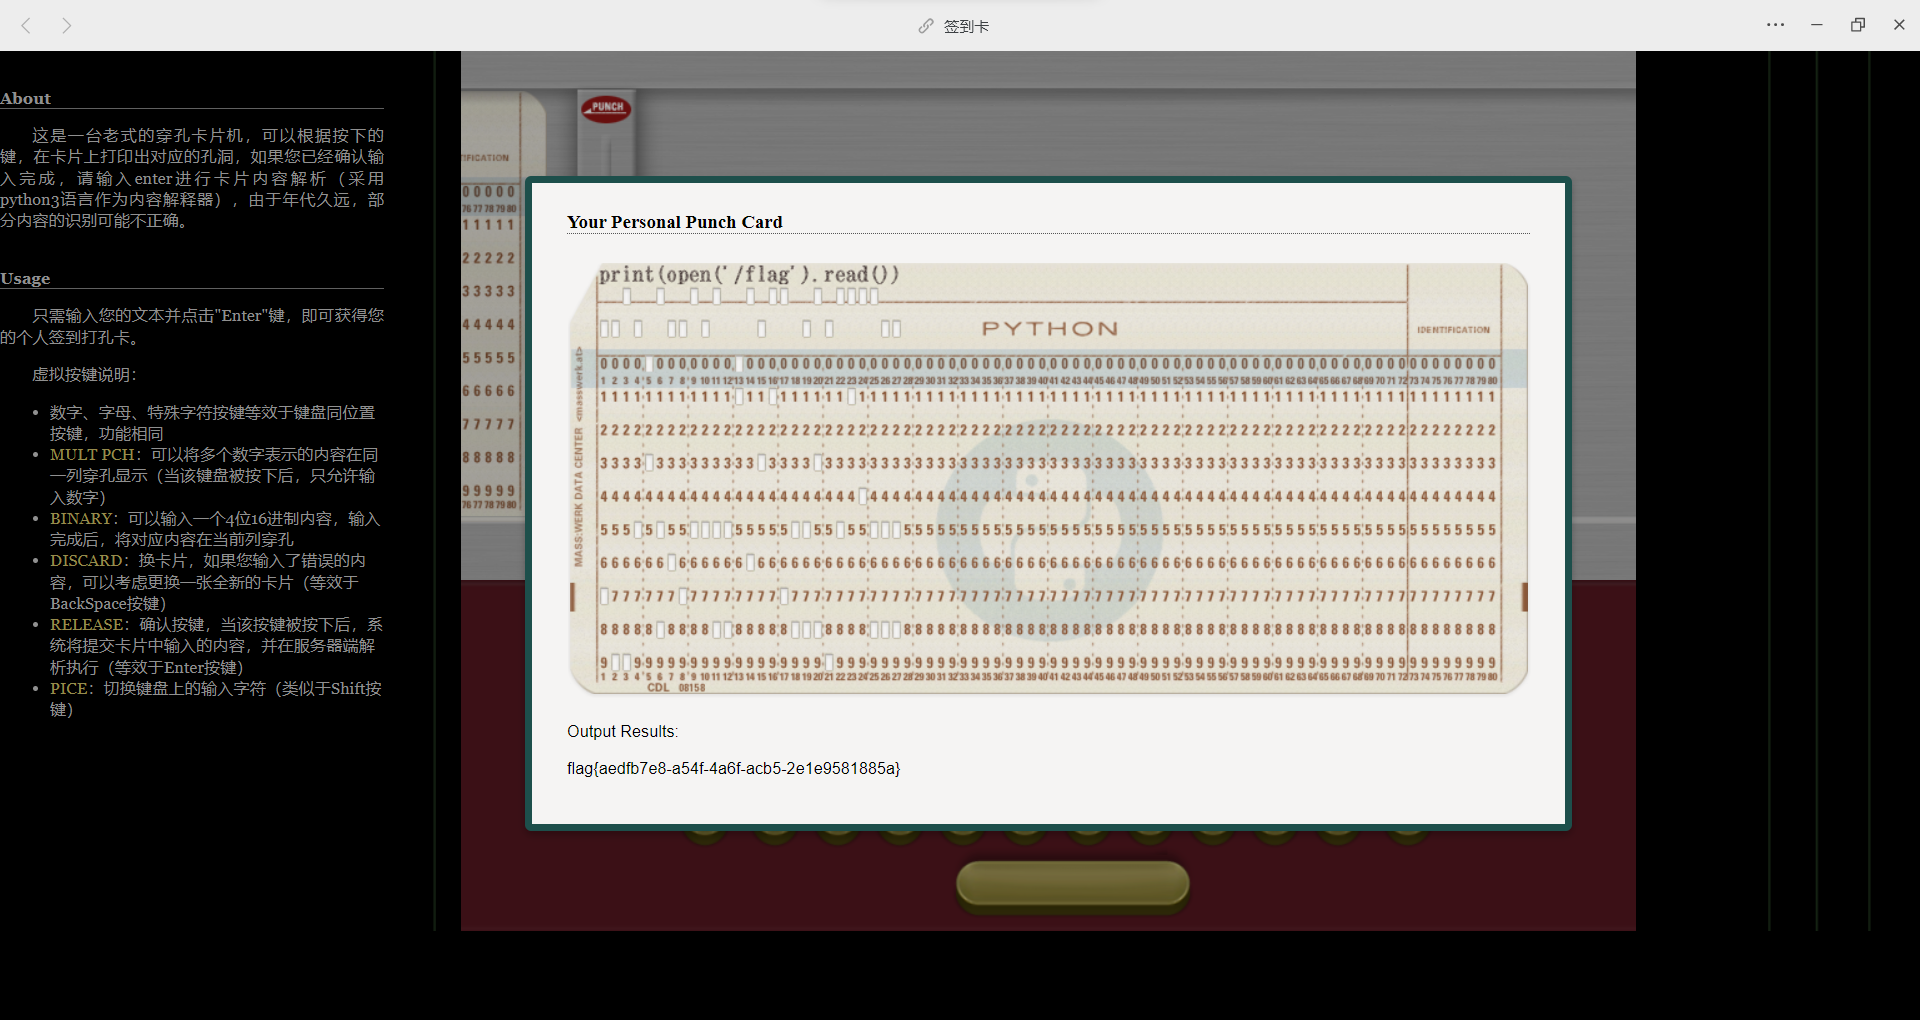
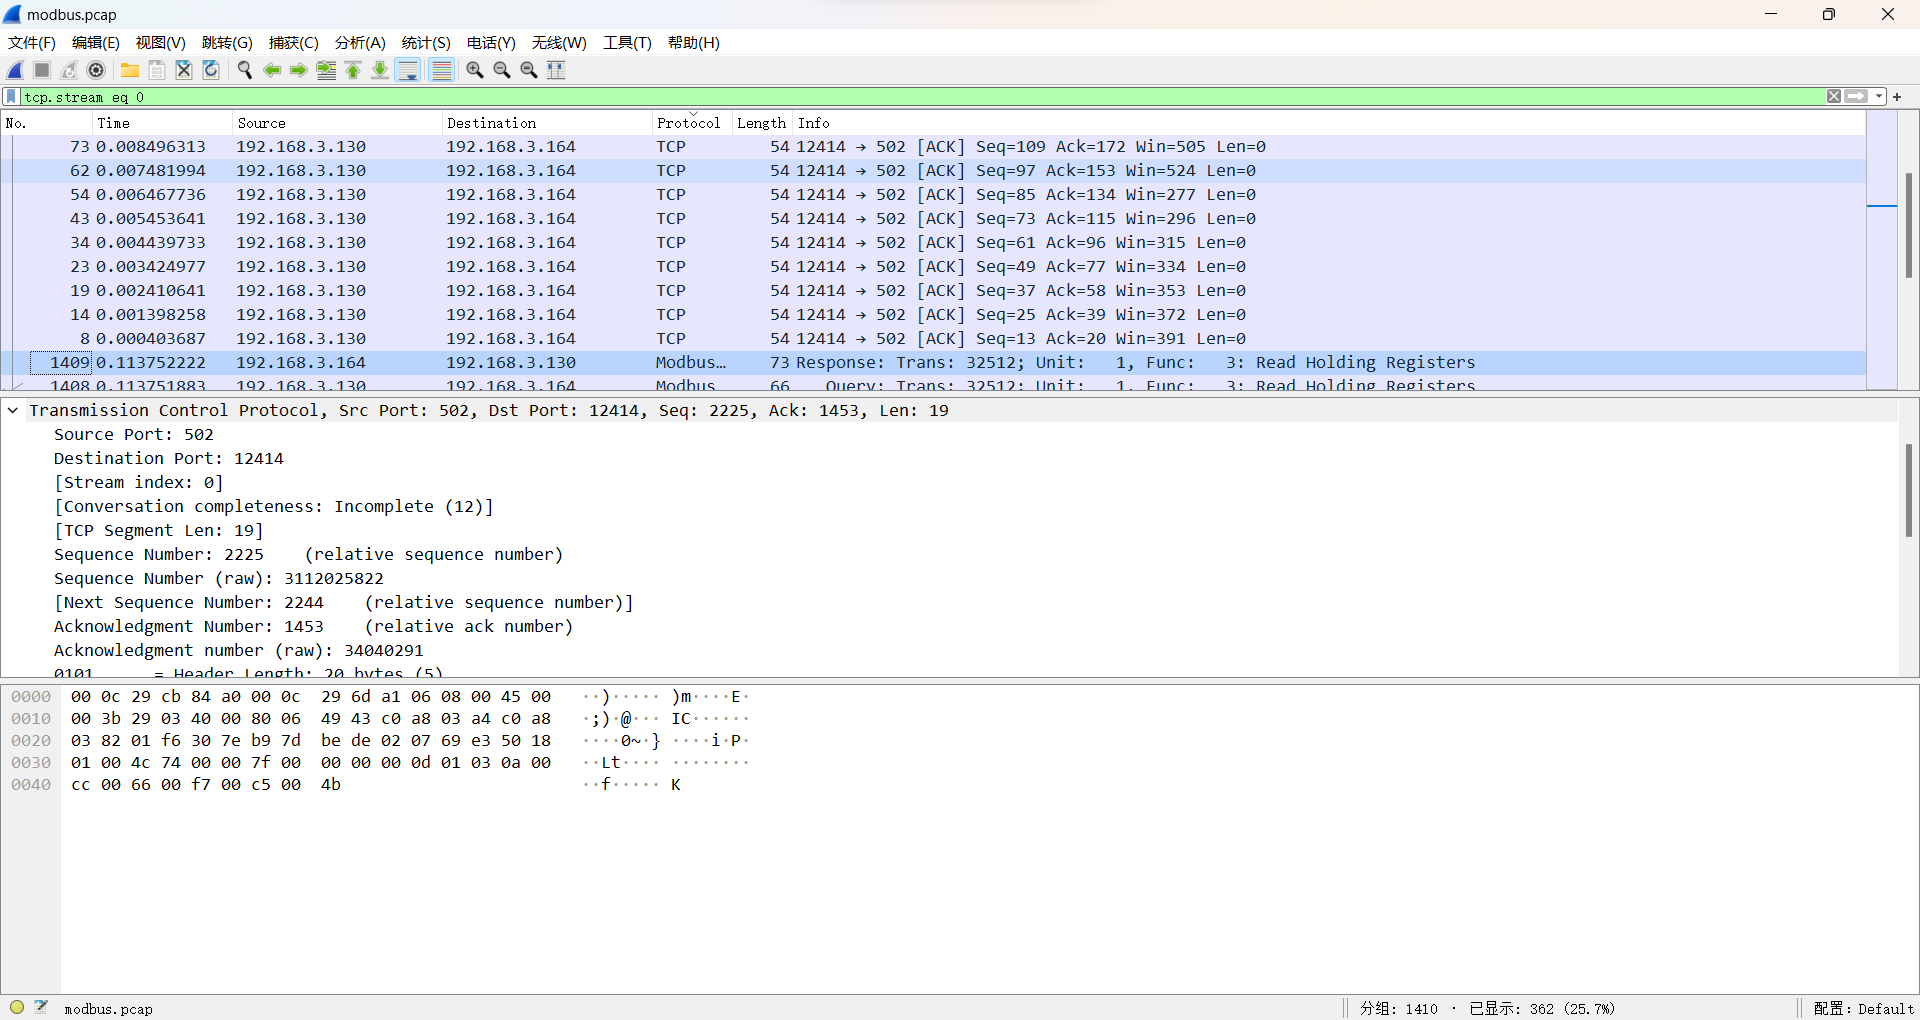
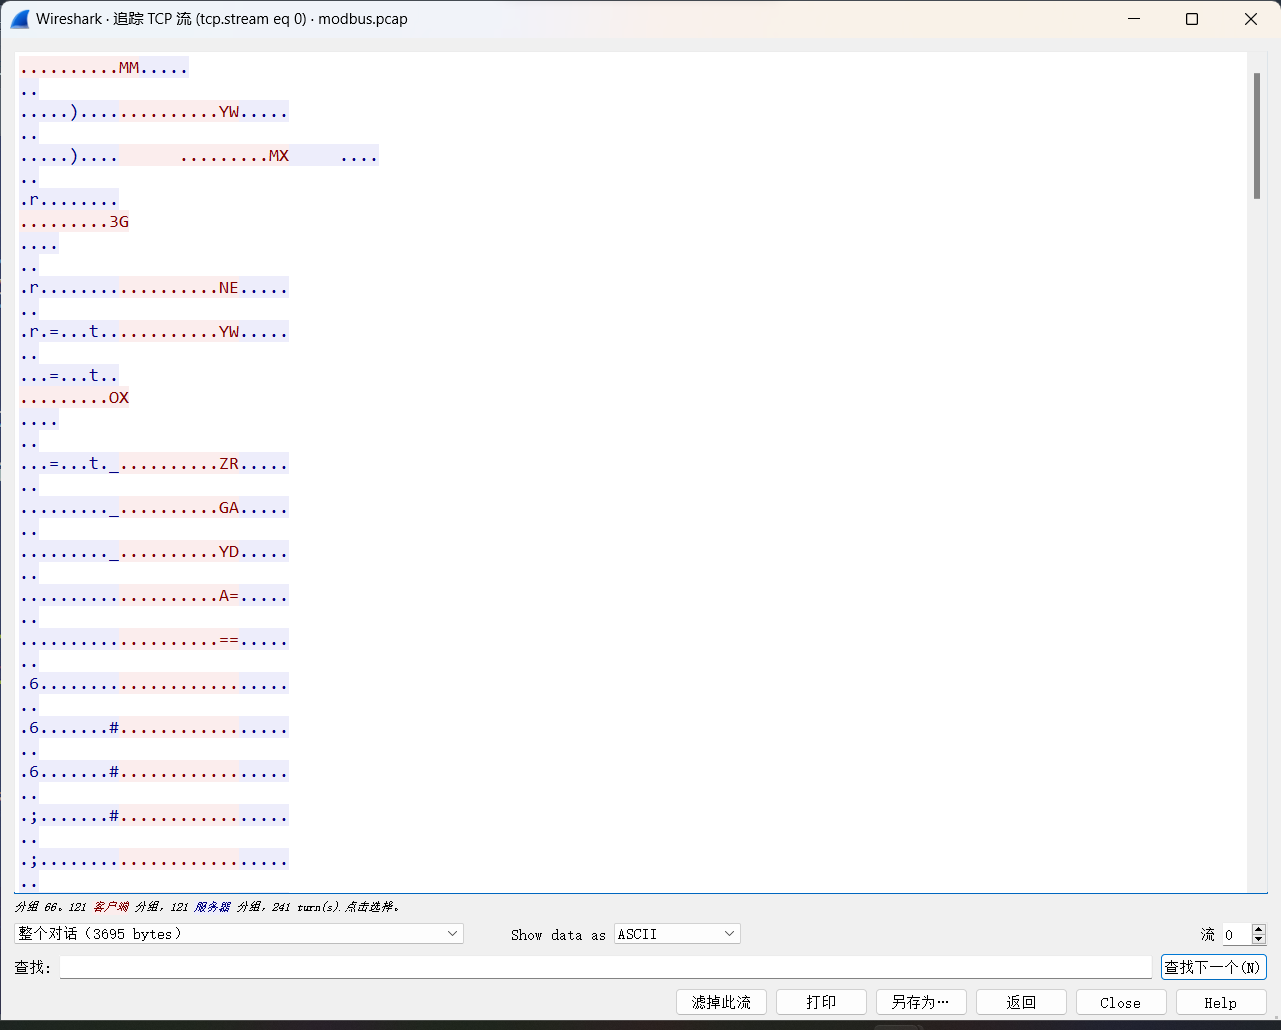
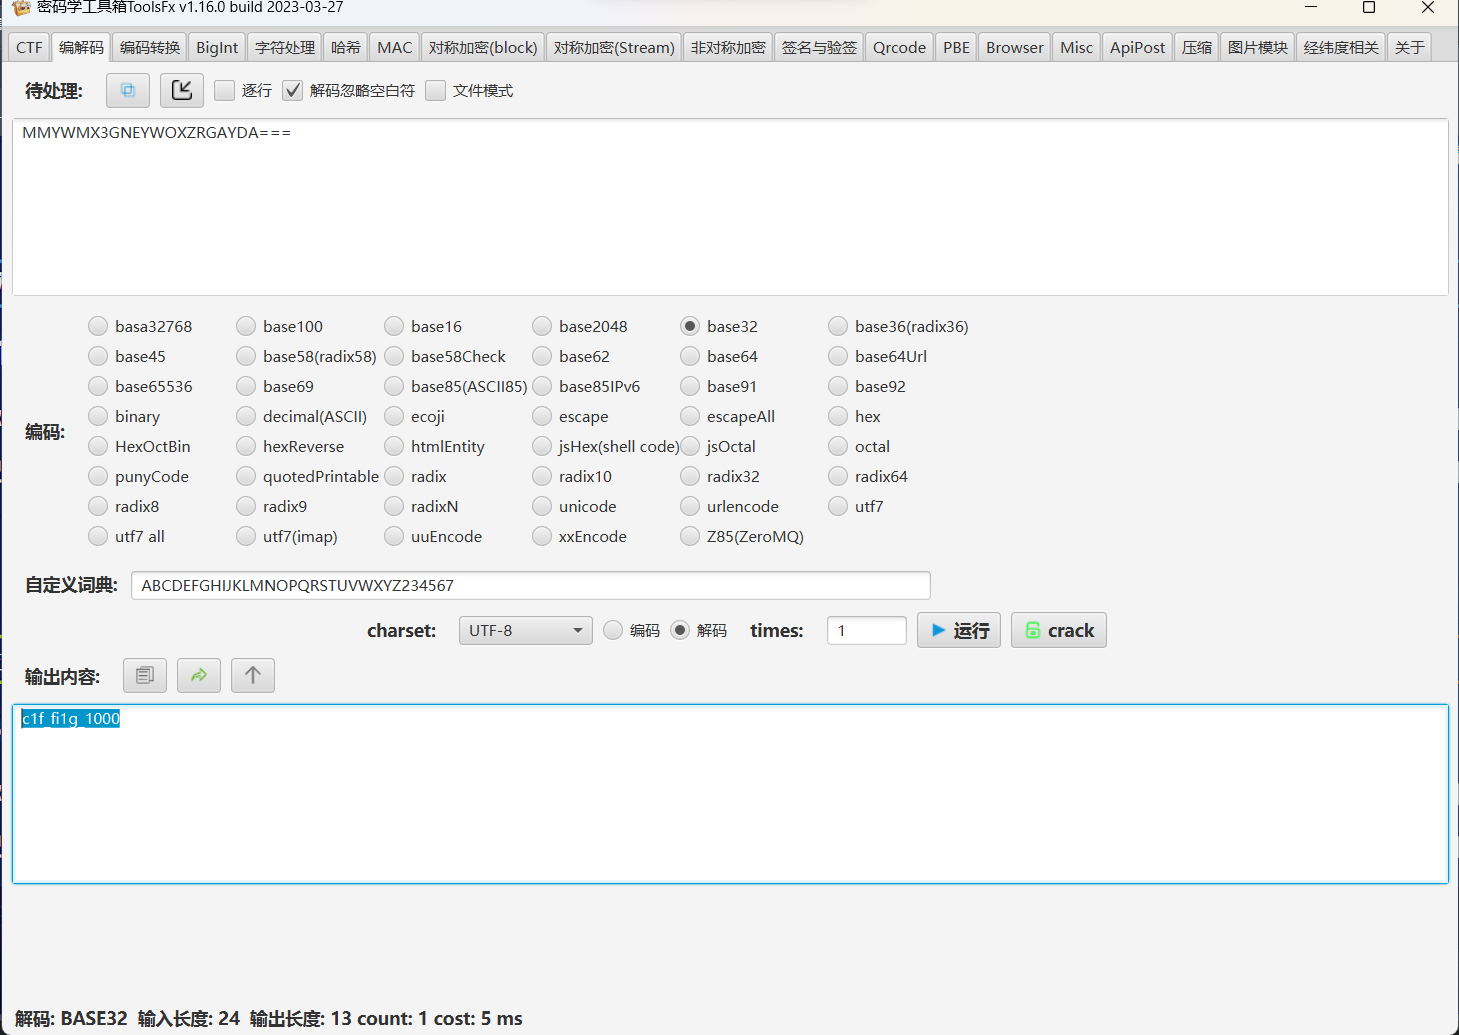
      <![CDATA[<p>这次2023ciscn非常开心，下次还来坐牢（</p><p>27日肝出2题，半场写个WP~</p><p>1.签到卡：</p><p>已知使用Python读取某个文件的代码为</p><figure class="highlight plaintext"><table><tr><td class="gutter"><pre><span class="line">1</span><br></pre></td><td class="code"><pre><span class="line">print(open(&quot;文件地址&quot;).read())</span><br></pre></td></tr></table></figure><p><img src="http://image.penguinway.space/i/2023/05/27/64721a01d15c6.png"></p><p>2.被加密的生产流量</p><p>使用Wireshark打开题目所给的pcap文件，根据文件名提示，使用modbus规则过滤</p><p><img src="http://image.penguinway.space/i/2023/05/27/64721b2a2eb41.png"></p><p>追踪modbus对应的TCP流，在流头部发现疑似base family加密</p><p><img src="http://image.penguinway.space/i/2023/05/27/64721b3f135f1.png"></p><p>使用密码学工具箱进行base32解密得到字符串</p><p> <a href="https://github.com/" title="Github">GitHub</a></p><p><a href="https://github.com/Leon406/ToolsFx">Leon406&#x2F;ToolsFx</a></p><p><img src="http://image.penguinway.space/i/2023/05/27/64721b5e6abaa.png"></p>]]>
    </content>
    <id>https://penguinway.github.io/posts/12234.html</id>
    <link href="https://penguinway.github.io/posts/12234.html"/>
    <published>2023-05-27T15:04:36.000Z</published>
    <summary>
      <![CDATA[<p>这次2023ciscn非常开心，下次还来坐牢（</p>
<p>27日肝出2题，半场写个WP~</p>
<p>1.签到卡：</p>
<p>已知使用Python读取某个文件的代码为</p>
<figure class="highlight plaintext"><table><]]>
    </summary>
    <title>CISCN 2023初赛Misc27日部分WP</title>
    <updated>2023-05-27T15:04:36.000Z</updated>
  </entry>
  <entry>
    <author>
      <name>Penguin</name>
    </author>
    <category term="2023" scheme="https://penguinway.github.io/categories/2023/"/>
    <category term="CTF" scheme="https://penguinway.github.io/categories/CTF/"/>
    <category term="CTF" scheme="https://penguinway.github.io/tags/CTF/"/>
    <content>
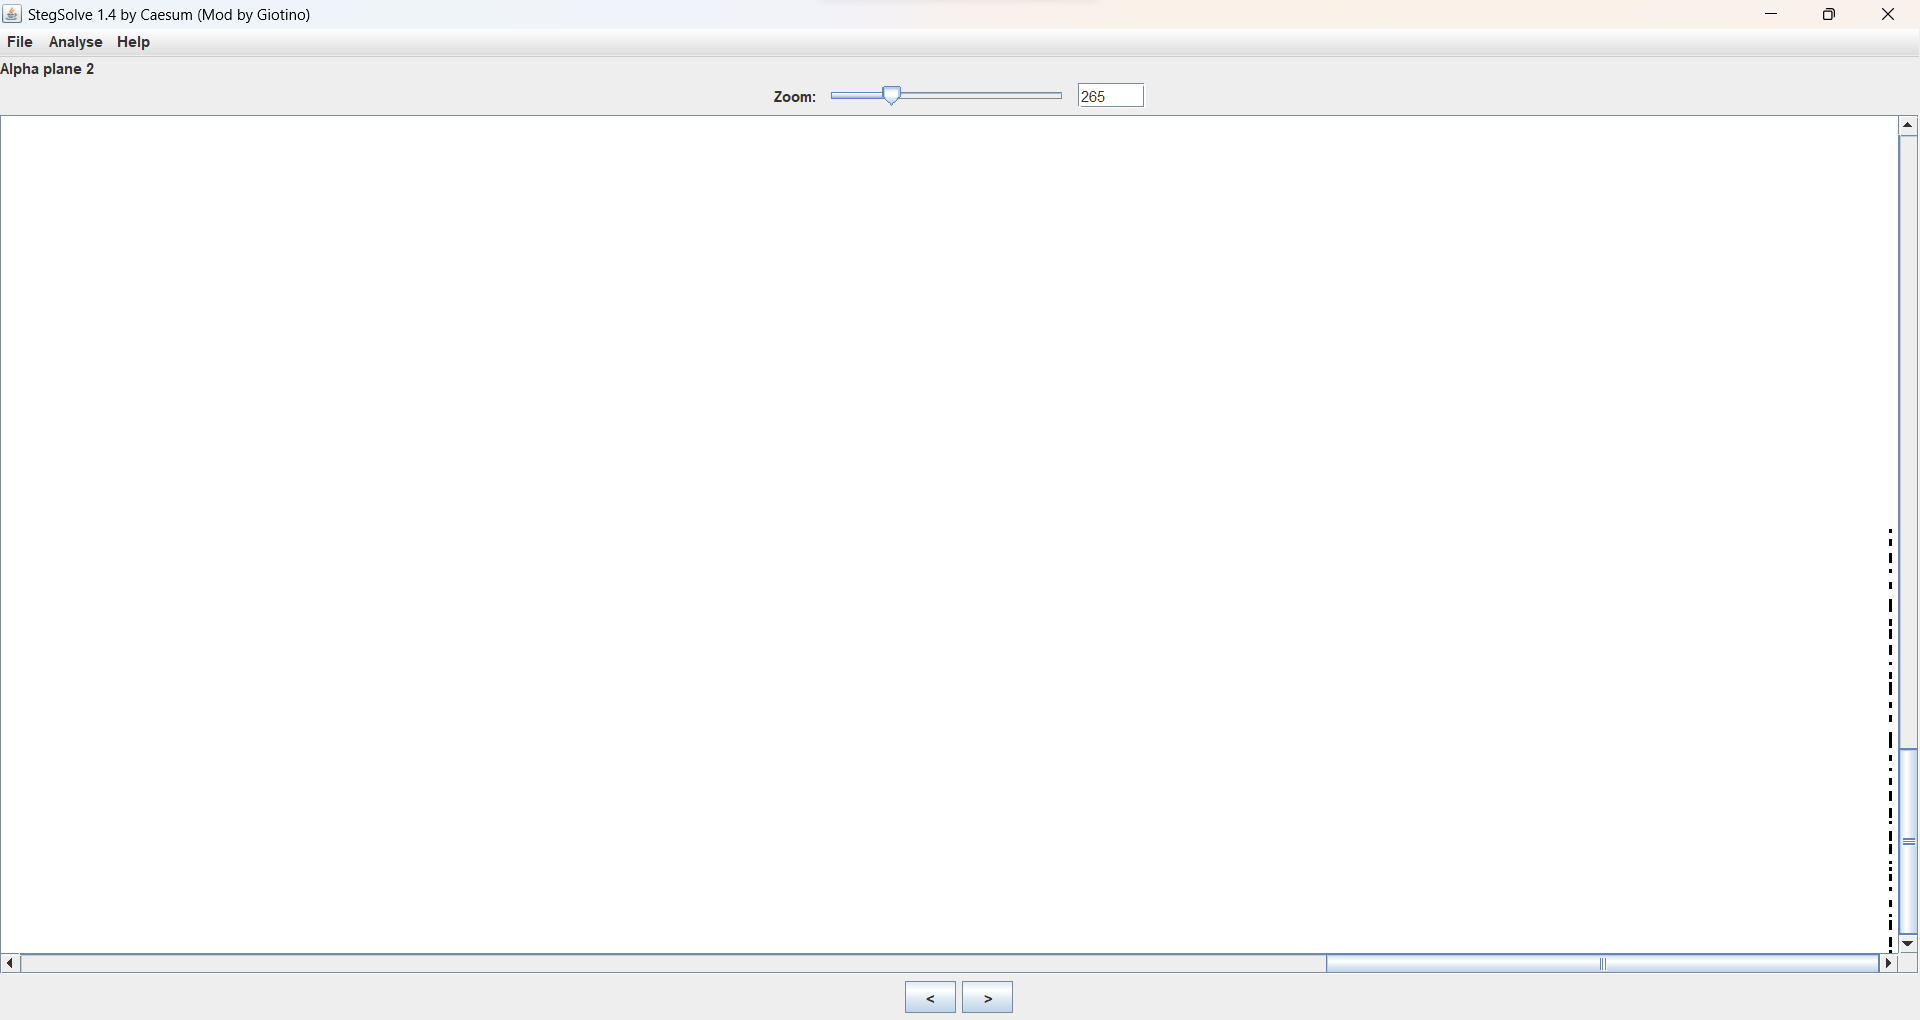
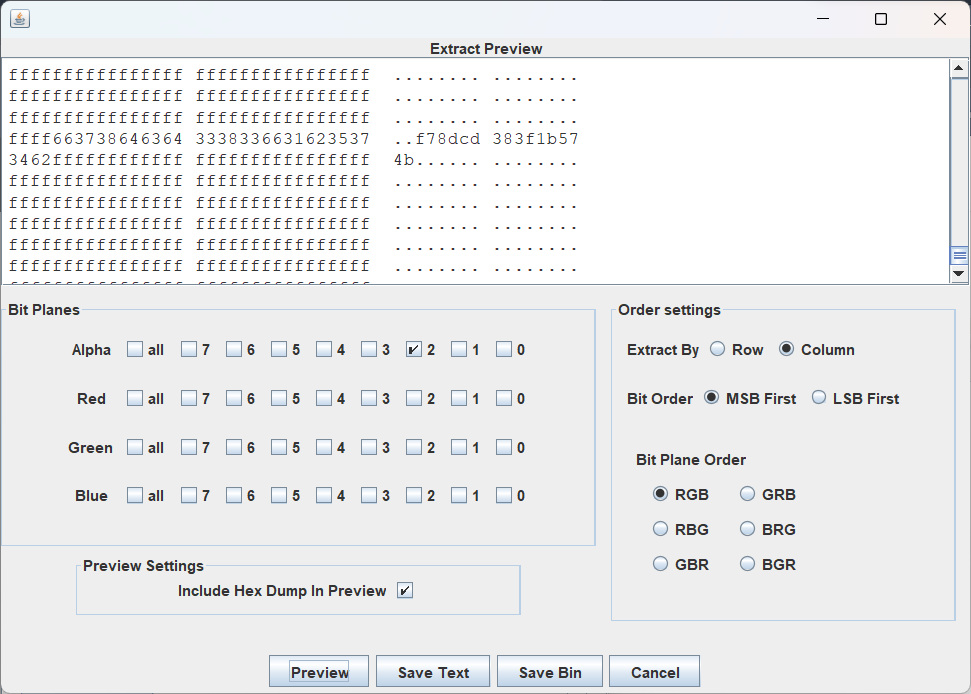
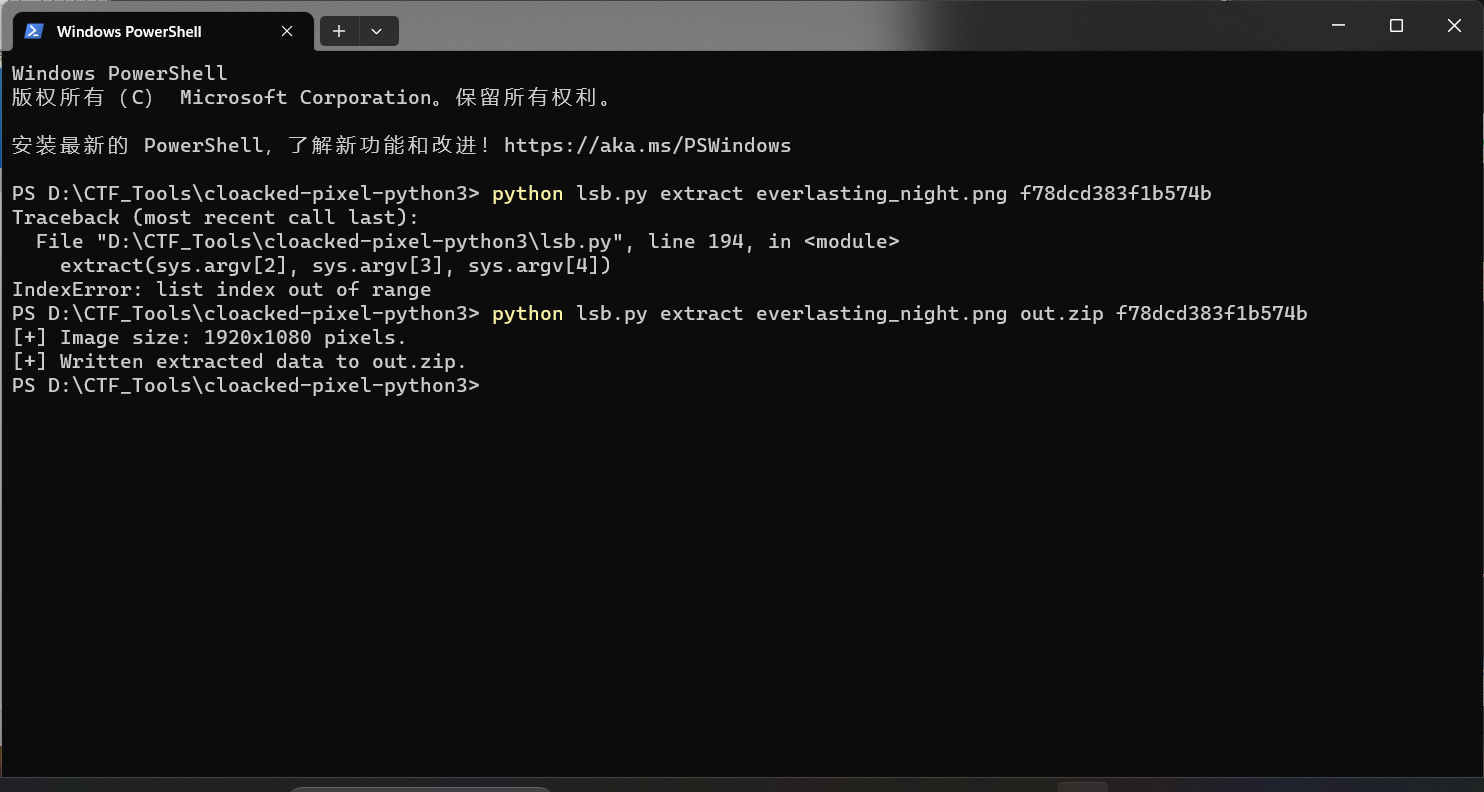
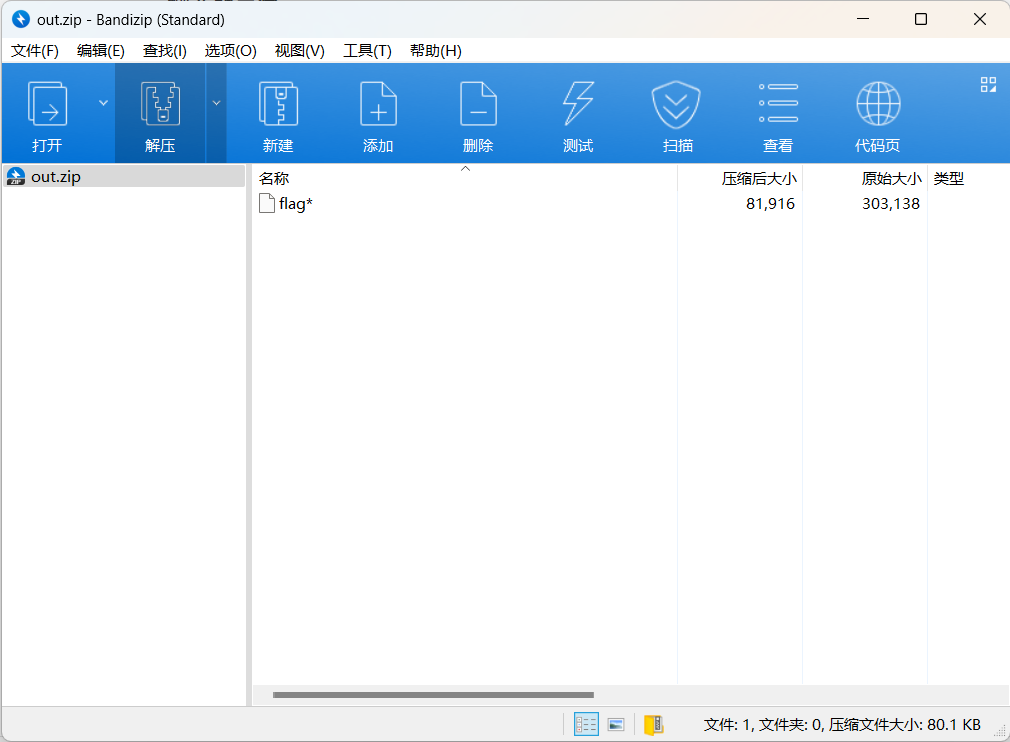
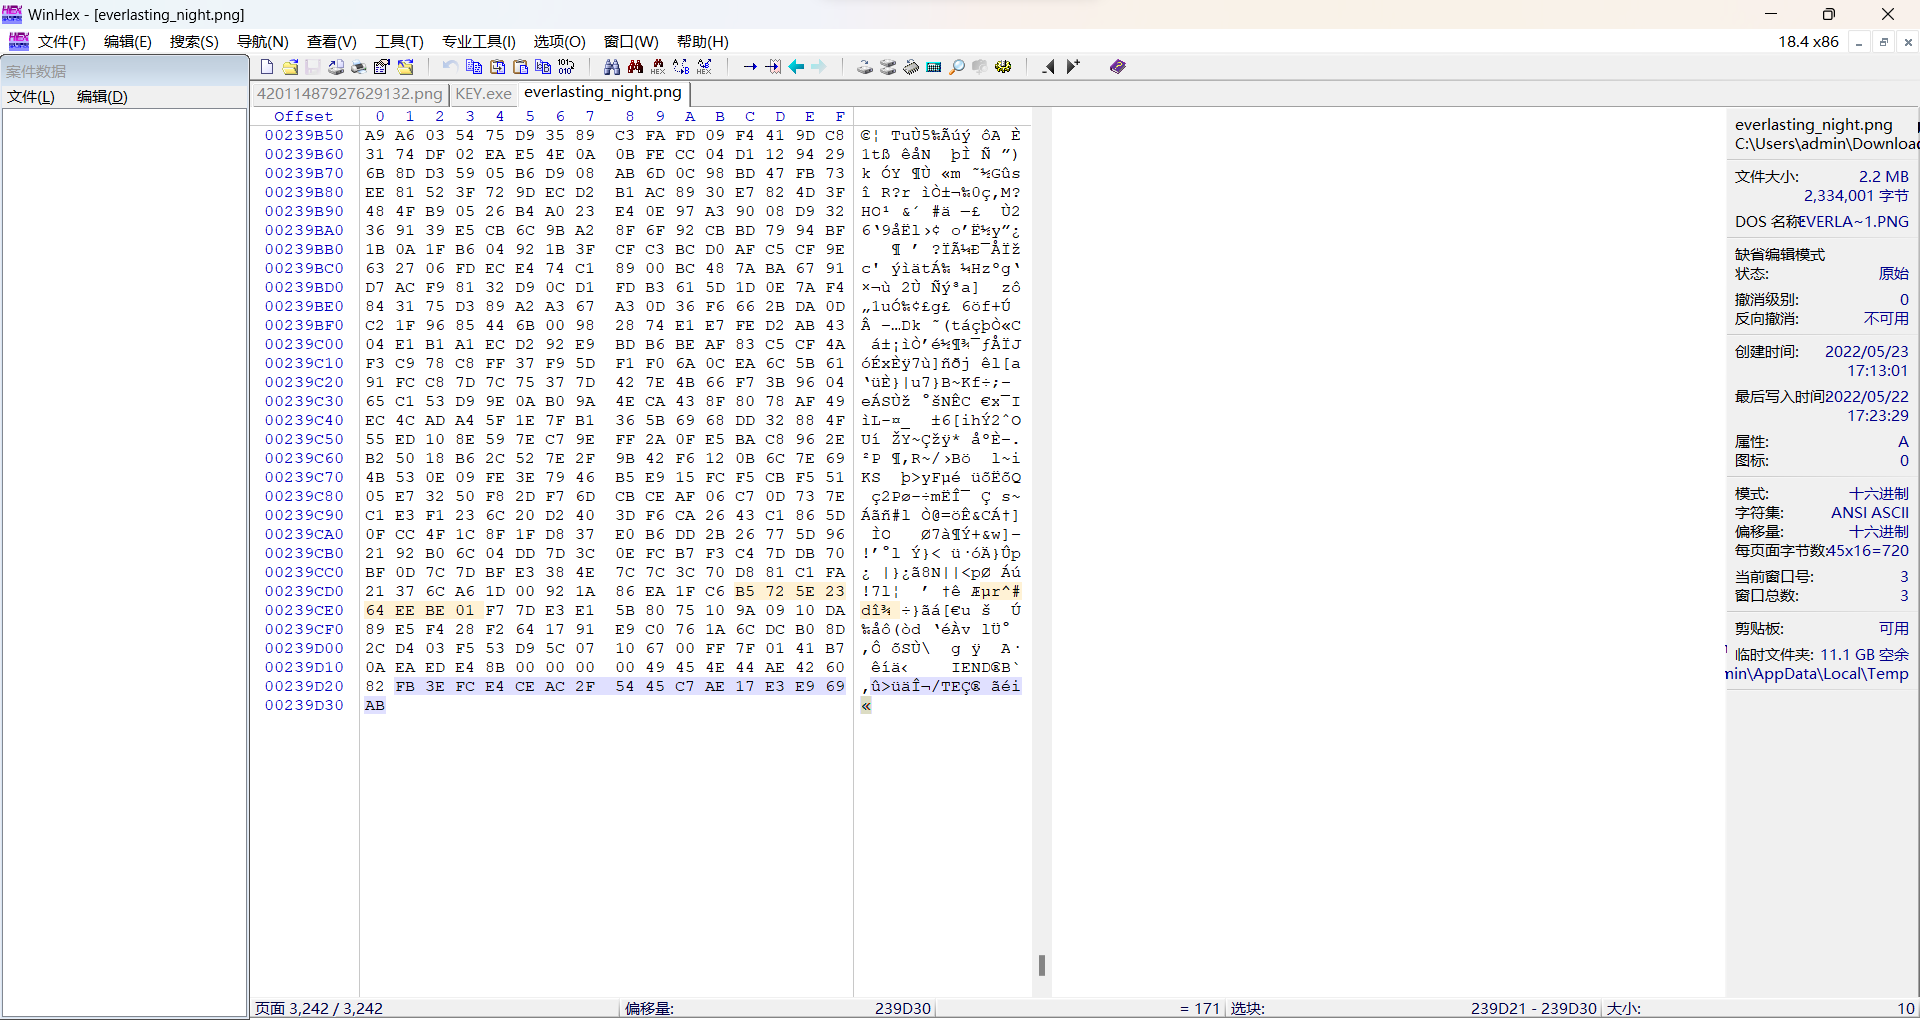
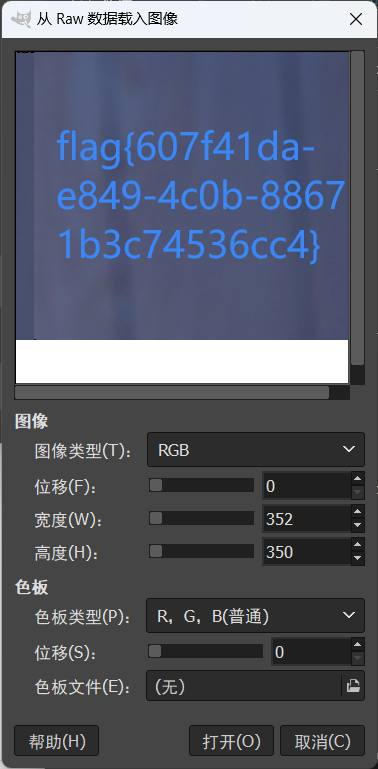
      <![CDATA[<p>下载附件，得到图片</p><p><img src="http://image.penguinway.space/i/2023/05/26/6470bb3f66280.png"></p><p>利用stegsolver打开，观察到alpha2通道有隐藏信息</p><p><img src="http://image.penguinway.space/i/2023/05/26/6470bc1edfade.png"></p><p>打开DATA extract有</p><p><img src="http://image.penguinway.space/i/2023/05/26/6470bc7e10ff7.png"></p><p>利用Github开源项目</p><p> <a href="https://github.com/" title="Github">GitHub</a></p><p><a href="https://github.com/Grazee/cloacked-pixel-python3">Grazee&#x2F;cloacked-pixel-python3</a></p><p>输入命令有</p><p><img src="http://image.penguinway.space/i/2023/05/26/6470be7367482.png"></p><p>得到压缩包如图：</p><p><img src="http://image.penguinway.space/i/2023/05/26/6470be96969eb.png"></p><p>压缩包有密码，在试图爆破的同时寻找其他线索，最终在源png文件尾部发现附加信息</p><p><img src="http://image.penguinway.space/i/2023/05/26/6470bf1d934d4.png"></p><p>SOMD5解密得到密码：ohhWh04m1</p><p>解压得到flag文件，记事本打开发现为图片文件，但是不是常见的图片。在搜索引擎的帮助下，解决办法，使用GIMP打开，后缀名为.data，修改宽高得到flag</p><p><img src="http://image.penguinway.space/i/2023/05/26/6470c06b0f97a.png"></p><p>感想：</p><p>做misc题，脑子一定要随机应变，多运用方法尽力解决问题</p>]]>
    </content>
    <id>https://penguinway.github.io/posts/7291.html</id>
    <link href="https://penguinway.github.io/posts/7291.html"/>
    <published>2023-05-26T14:22:51.000Z</published>
    <summary>
      <![CDATA[<p>下载附件，得到图片</p>
<p><img src="http://image.penguinway.space/i/2023/05/26/6470bb3f66280.png"></p>
<p>利用stegsolver打开，观察到alpha2通道有隐藏信息</p>
<p><]]>
    </summary>
    <title>CISCN2022初赛 everlasting_night题解</title>
    <updated>2023-05-26T14:22:51.000Z</updated>
  </entry>
  <entry>
    <author>
      <name>Penguin</name>
    </author>
    <category term="2023" scheme="https://penguinway.github.io/categories/2023/"/>
    <category term="CTF" scheme="https://penguinway.github.io/categories/CTF/"/>
    <category term="CTF" scheme="https://penguinway.github.io/tags/CTF/"/>
    <category term="BUUCTF" scheme="https://penguinway.github.io/tags/BUUCTF/"/>
    <content>
      <![CDATA[<p>一、名称</p><p>BUUCTF Misc N种方法解决</p><p>二、题目链接：<a href="https://buuoj.cn/challenges">https://buuoj.cn/challenges</a></p><p>解压缩后是一个exe执行文件</p><p>无法打开，未获得结果，换其它解决方法。</p><p>三、解题步骤<br>1、使用winhex工具打开KEY.exe文件，查看一下内部结构</p><p>2、发现文档后面有两个等号（&#x3D;&#x3D;），前面有着data:image&#x2F;jpg;base64。猜测可能是一个经过base64编码的图片，于是将那一串字符串作为网址，粘贴到浏览器中，打开后得到一张二维码图片，将获得的二维码作为图片保存。<br>3、使用QR工具进行解析</p><p>4、解析后得到了flag值</p><p>KEY{dca57f966e4e4e31fd5b15417da63269}</p><p>5、提交答案flag为</p><p>flag{dca57f966e4e4e31fd5b15417da63269}</p><p>此题第2步中，也可以将那一串字符串通过工具解密，得到二维码图片，不一定非要通过浏览器打开才能得到。<br>————————————————<br>版权声明：本文为CSDN博主「一只小蜜蜂飞飞飞」的原创文章，遵循CC 4.0 BY-SA版权协议<br>原文链接：<a href="https://blog.csdn.net/zehan9279/article/details/119282461">https://blog.csdn.net/zehan9279/article/details/119282461</a></p>]]>
    </content>
    <id>https://penguinway.github.io/posts/61032.html</id>
    <link href="https://penguinway.github.io/posts/61032.html"/>
    <published>2023-05-25T15:04:02.000Z</published>
    <summary>
      <![CDATA[<p>一、名称</p>
<p>BUUCTF Misc N种方法解决</p>
<p>二、题目链接：<a href="https://buuoj.cn/challenges">https://buuoj.cn/challenges</a></p>
<p>解压缩后是一个exe执行文件<]]>
    </summary>
    <title>BUUCTF Misc N种方法解决</title>
    <updated>2023-05-25T15:04:02.000Z</updated>
  </entry>
  <entry>
    <author>
      <name>Penguin</name>
    </author>
    <category term="服务器折腾那些事" scheme="https://penguinway.github.io/categories/%E6%9C%8D%E5%8A%A1%E5%99%A8%E6%8A%98%E8%85%BE%E9%82%A3%E4%BA%9B%E4%BA%8B/"/>
    <category term="图床" scheme="https://penguinway.github.io/tags/%E5%9B%BE%E5%BA%8A/"/>
    <category term="服务器" scheme="https://penguinway.github.io/tags/%E6%9C%8D%E5%8A%A1%E5%99%A8/"/>
    <content>
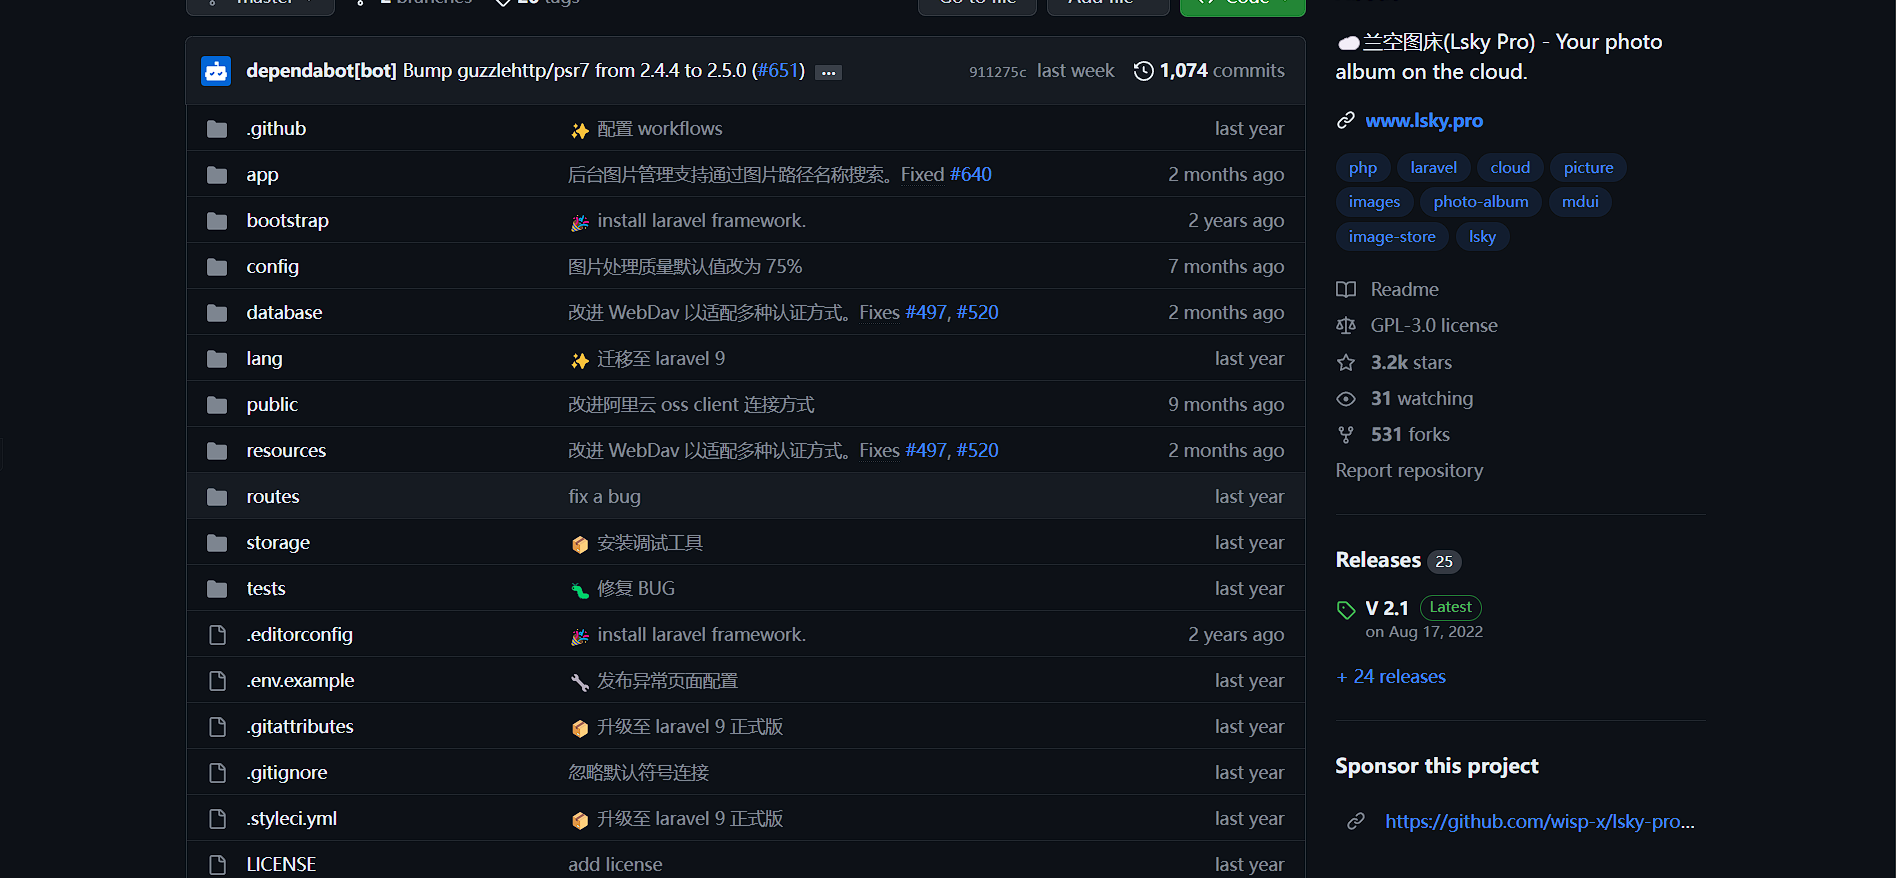
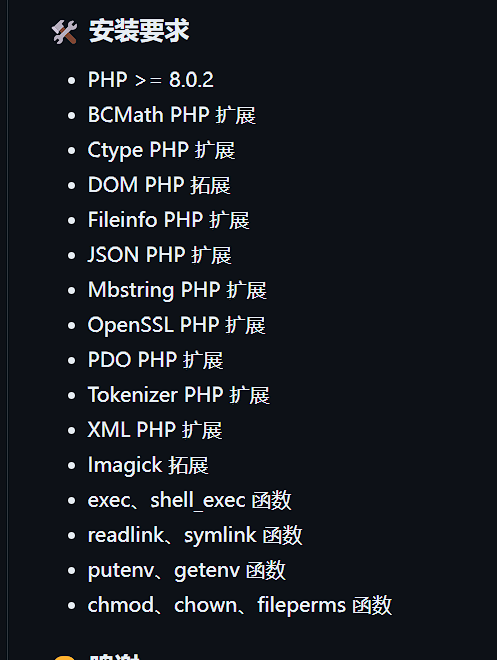
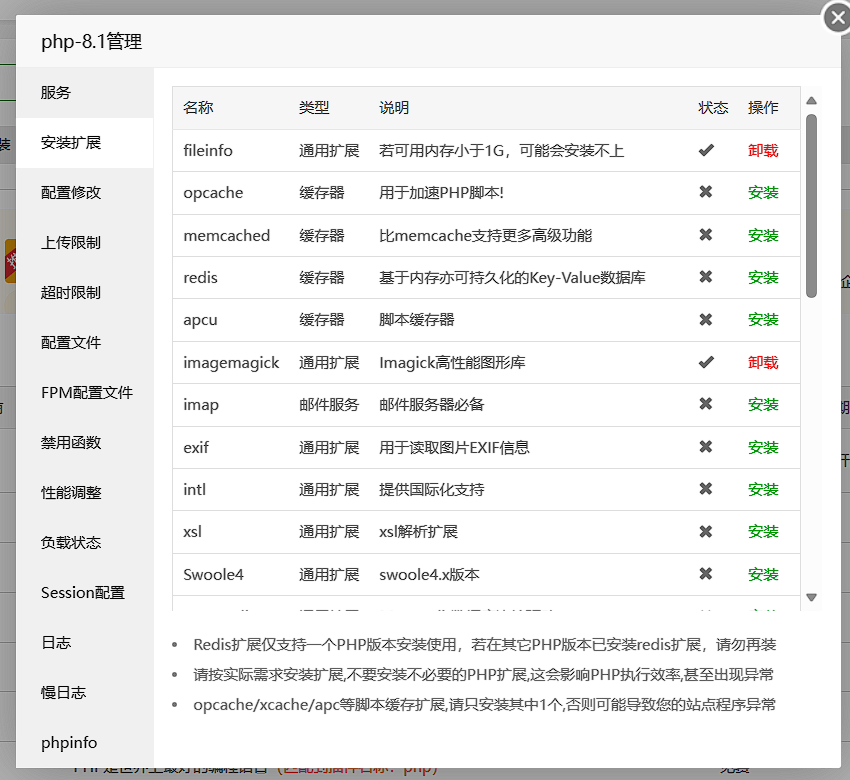
      <![CDATA[<p><strong>1.前言</strong></p><p>图床就是用来存放图片的空间，同时允许外链到其他网站。由于写博客的需求，我们需要将图片置于服务器中才能正常显示，但是Wordpress自带的媒体库实在是难用，因而我决定自己在服务器中搭建一个自用的图床。</p><p>首先我们得找到一个合适的开源项目（别问，问就是博主太菜没办法自己写~），百般挑选下我选择了兰空图床，项目地址附上：<a href="https://github.com/lsky-org/lsky-pro">lsky-org&#x2F;lsky-pro: ☁️兰空图床(Lsky Pro) - Your photo album on the cloud. (github.com)</a></p><p>之后的搭建过程就全傻瓜式了~</p><p><strong>2.搭建</strong></p><p>博主的服务器管理使用的是宝塔面板，之后的步骤也以宝塔为范例</p><p>首先先在项目地址下载release版本</p><p><img src="http://image.penguinway.space/i/2023/05/23/646cd75ddc6f6.png"></p><p>然后想一个好听的地址，比如本人的是<a href="https://image.penguinway.space/">https://image.penguinway.space</a></p><p>在域名解析控制台上配置好域名解析，然后在宝塔上建站，记得创建数据库。</p><p>记得安装要求哦~</p><p><img src="http://image.penguinway.space/i/2023/05/23/646cd87e7bf16.png"></p><p>对应的PHP模块可以在宝塔的PHP管理上找到。具体在软件商店&gt;php*.*(版本号)&gt;设置&gt;安装拓展&#x2F;禁用函数</p><p><img src="http://image.penguinway.space/i/2023/05/23/646cd9403e4d3.png"></p><p>随后将网站的运行目录设置为public</p><p><img src="http://image.penguinway.space/i/2023/05/23/646cda240c760.png"></p><p>访问设置好的网站地址，就会进入安装界面<del>（图片就不放出了</del>）</p><p>随后待安装检测通过后跟着提示，进行数据库的设置和管理员账号的设置，最后一切完成后就可以享受自建图床的快乐啦~</p>]]>
    </content>
    <id>https://penguinway.github.io/posts/435.html</id>
    <link href="https://penguinway.github.io/posts/435.html"/>
    <published>2023-05-23T15:27:34.000Z</published>
    <summary>
      <![CDATA[<p><strong>1.前言</strong></p>
<p>图床就是用来存放图片的空间，同时允许外链到其他网站。由于写博客的需求，我们需要将图片置于服务器中才能正常显示，但是Wordpress自带的媒体库实在是难用，因而我决定自己在服务器中搭建一个自用的图床。</p>
<p>]]>
    </summary>
    <title>使用开源项目搭建自用图床</title>
    <updated>2023-05-23T15:27:34.000Z</updated>
  </entry>
  <entry>
    <author>
      <name>Penguin</name>
    </author>
    <category term="2023" scheme="https://penguinway.github.io/categories/2023/"/>
    <category term="CTF" scheme="https://penguinway.github.io/categories/CTF/"/>
    <category term="CTF" scheme="https://penguinway.github.io/tags/CTF/"/>
    <category term="Write-UP" scheme="https://penguinway.github.io/tags/Write-UP/"/>
    <content>
      <![CDATA[<p>总榜单：</p><p><img src="http://www.penguinway.space/wp-content/uploads/2023/05/%E5%B1%8F%E5%B9%95%E6%88%AA%E5%9B%BE-2023-05-21-230805-1024x518.png"></p><p>曲折的过程</p><p><img src="http://www.penguinway.space/wp-content/uploads/2023/05/%E5%B1%8F%E5%B9%95%E6%88%AA%E5%9B%BE-2023-05-21-230914-1024x375.png"></p><p>暴打出题人：使用winhex 打开图片，将 IHDR 区域的高度改为 06，flag 出现</p><p><img src="http://www.penguinway.space/wp-content/uploads/2023/05/%E5%B1%8F%E5%B9%95%E6%88%AA%E5%9B%BE-2023-05-14-220048-1024x544.png"></p><p><img src="http://www.penguinway.space/wp-content/uploads/2023/05/%E5%B1%8F%E5%B9%95%E6%88%AA%E5%9B%BE-2023-05-14-220208-1024x544.png"></p><p>再次暴打出题人：观察文件大小，判断其为多个文件合成，使用 foremost 分离文件，</p><p><img src="http://www.penguinway.space/wp-content/uploads/2023/05/%E5%B1%8F%E5%B9%95%E6%88%AA%E5%9B%BE-2023-05-14-220532.png"></p><p><img src="http://www.penguinway.space/wp-content/uploads/2023/05/%E5%B1%8F%E5%B9%95%E6%88%AA%E5%9B%BE-2023-05-14-220602-1024x544.png"></p><p>签到：直接从题干获取 flag</p><p><img src="http://www.penguinway.space/wp-content/uploads/2023/05/%E5%B1%8F%E5%B9%95%E6%88%AA%E5%9B%BE-2023-05-14-220743-1024x190.png"></p><p>2roman2hex：根据题目判断为 16 进制及罗马数字双重加密</p><p><img src="http://www.penguinway.space/wp-content/uploads/2023/05/%E5%B1%8F%E5%B9%95%E6%88%AA%E5%9B%BE-2023-05-14-221404-1024x544.png"></p><p>进一步将罗马数字转换为 10 进制</p><p>Flag 截图丢失</p><p>Basefamily:分段解码得到 flag</p><p><img src="http://www.penguinway.space/wp-content/uploads/2023/05/%E5%B1%8F%E5%B9%95%E6%88%AA%E5%9B%BE-2023-05-14-221055-1024x190.png"></p><p>Matrix：使用在线扫码工具，发现其为新与佛论禅编码和 ROT19 编码结合，解码得到 flag</p><p><img src="http://www.penguinway.space/wp-content/uploads/2023/05/%E5%B1%8F%E5%B9%95%E6%88%AA%E5%9B%BE-2023-05-14-231024-1024x544.png"></p><p><img src="http://www.penguinway.space/wp-content/uploads/2023/05/%E5%B1%8F%E5%B9%95%E6%88%AA%E5%9B%BE-2023-05-14-231340-1024x544.png"></p><p><img src="http://www.penguinway.space/wp-content/uploads/2023/05/%E5%B1%8F%E5%B9%95%E6%88%AA%E5%9B%BE-2023-05-14-231506-1024x544.png"></p><p>tooooooo_fast：利用 pr 截取视频帧，得到二维码，利用在线扫码平台得到 flag</p><p><img src="http://www.penguinway.space/wp-content/uploads/2023/05/%E5%B1%8F%E5%B9%95%E6%88%AA%E5%9B%BE-2023-05-14-163504.png"></p><p><img src="http://www.penguinway.space/wp-content/uploads/2023/05/%E5%B1%8F%E5%B9%95%E6%88%AA%E5%9B%BE-2023-05-14-232315-1024x544.png"></p><p>weak password：利用爆破工具得到密码 1467，进而得到 flag</p><p><img src="http://www.penguinway.space/wp-content/uploads/2023/05/%E5%B1%8F%E5%B9%95%E6%88%AA%E5%9B%BE-2023-05-14-232626-1024x190.png"></p><p>easy_stego：利用工具得到 flag</p><p><img src="http://www.penguinway.space/wp-content/uploads/2023/05/%E5%B1%8F%E5%B9%95%E6%88%AA%E5%9B%BE-2023-05-14-232758.png"></p><p>还是看不见我：观察得知可以利用反色得到 flag，遂利用 Photoshop 反色功能得到 flag</p><p><img src="http://www.penguinway.space/wp-content/uploads/2023/05/%E5%B1%8F%E5%B9%95%E6%88%AA%E5%9B%BE-2023-05-14-233722-1024x549.png"></p><p>dididi：通过 AU 观察得知摩斯电码，解码得到 flag</p><p><img src="http://www.penguinway.space/wp-content/uploads/2023/05/%E5%B1%8F%E5%B9%95%E6%88%AA%E5%9B%BE-2023-05-15-160519-1024x544.png"></p><p>flag_underwave：利用 au 打开音频，观察频谱图得到 flag</p><p><img src="http://www.penguinway.space/wp-content/uploads/2023/05/%E5%B1%8F%E5%B9%95%E6%88%AA%E5%9B%BE-2023-05-15-160704-1024x544.png"></p><p>forgot_crypt：观察知该压缩包为伪加密，利用 winhex 修改文件得到 flag</p><p><img src="http://www.penguinway.space/wp-content/uploads/2023/05/%E5%B1%8F%E5%B9%95%E6%88%AA%E5%9B%BE-2023-05-15-161007-1-1024x190.png"></p><p>recovery_images：观察文件知其需要恢复 RGB 颜色，遂编写 python 代码得到 flag 图片。</p><p><img src="http://www.penguinway.space/wp-content/uploads/2023/05/%E5%B1%8F%E5%B9%95%E6%88%AA%E5%9B%BE-2023-05-15-161204-1024x549.png"></p><p><img src="http://www.penguinway.space/wp-content/uploads/2023/05/001.jpg"></p><p>strong_zip：由题目知该压缩包为强加密，但因为文件较小而可通过 CRC 穷举得到文件内容，使用 GitHub 项目进行穷举得到 flag</p><p><img src="http://www.penguinway.space/wp-content/uploads/2023/05/%E5%B1%8F%E5%B9%95%E6%88%AA%E5%9B%BE-2023-05-15-161527-1024x546.png"></p><p>耳机坏了？：通过 au 打开音频得知显然左声道为 flag 所在，试听知其为摩斯电码，译码知 flag</p><p><img src="http://www.penguinway.space/wp-content/uploads/2023/05/%E5%B1%8F%E5%B9%95%E6%88%AA%E5%9B%BE-2023-05-15-162043-1024x544.png"></p><p>看不见我：利用 7zip 将docx 解压，利用vscode 的全局搜索搜索到flag</p><p><img src="http://www.penguinway.space/wp-content/uploads/2023/05/%E5%B1%8F%E5%B9%95%E6%88%AA%E5%9B%BE-2023-05-15-162319-1024x549.png"></p><p>find_me：利用 Windows 文件属性面板得到经纬度，利用 exif 查看器得到具体位置，为德国柏林勃兰登堡门地铁站，谷歌得知其德文拉丁串。</p><p><img src="http://www.penguinway.space/wp-content/uploads/2023/05/%E5%B1%8F%E5%B9%95%E6%88%AA%E5%9B%BE-2023-05-15-162721-1024x544.png"></p><p><img src="http://www.penguinway.space/wp-content/uploads/2023/05/%E5%B1%8F%E5%B9%95%E6%88%AA%E5%9B%BE-2023-05-15-162819-1024x544.png"></p>]]>
    </content>
    <id>https://penguinway.github.io/posts/53360.html</id>
    <link href="https://penguinway.github.io/posts/53360.html"/>
    <published>2023-05-21T15:06:04.000Z</published>
    <summary>
      <![CDATA[<p>总榜单：</p>
<p><img src="http://www.penguinway.space/wp-content/uploads/2023/05/%E5%B1%8F%E5%B9%95%E6%88%AA%E5%9B%BE-2023-05-21-230805-1024x]]>
    </summary>
    <title>2023贡橙杯CTF院赛Write-UP</title>
    <updated>2023-05-21T15:06:04.000Z</updated>
  </entry>
</feed>